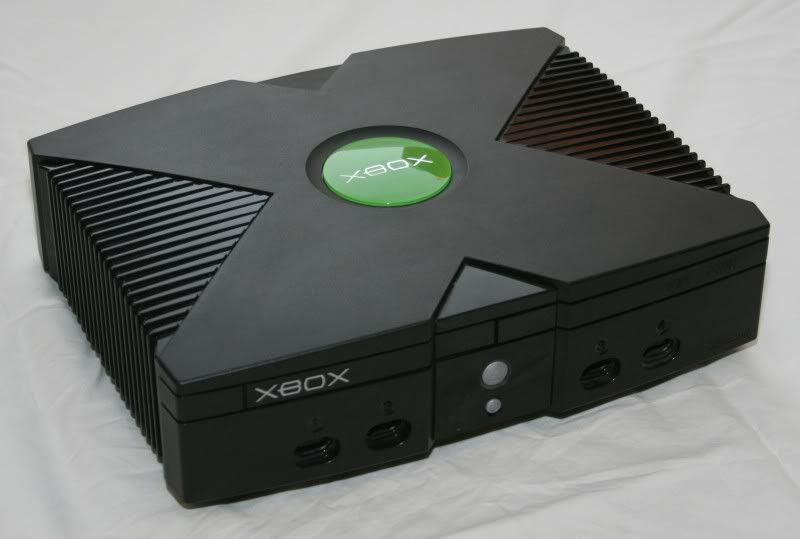
| Before | After |
|---|---|
 |
 |
Things you will need for this mod:
| Item | Picture | Comment |
|---|---|---|
| 18" of floss (roughly) | 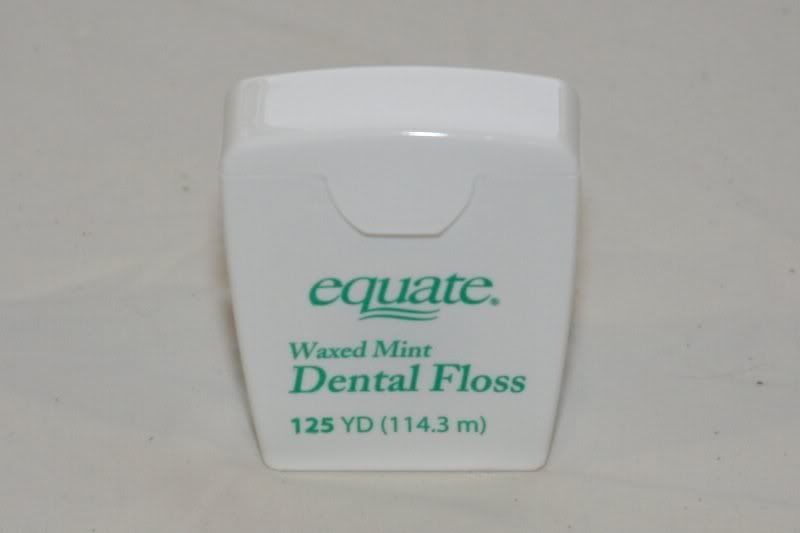
| You should already have this...if not, shame on you. (flavor doesn't matter) |
| Tiny Standard Screw Driver or Fingernail File | 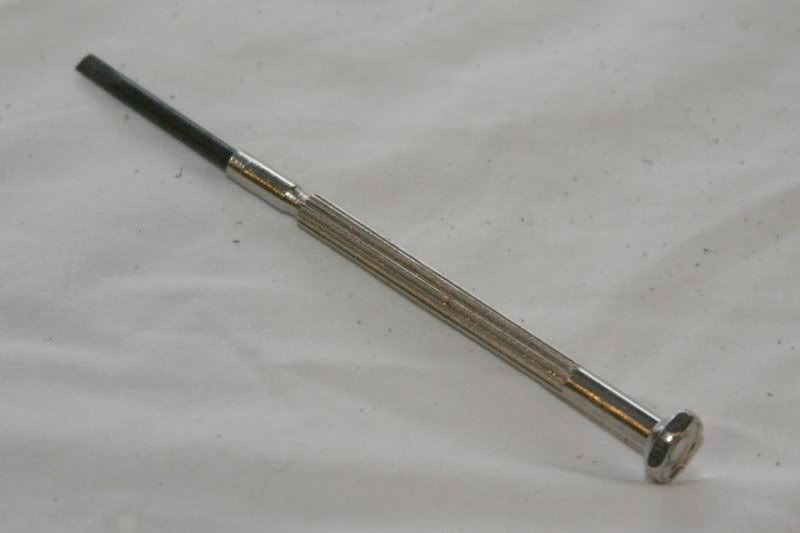
| This is for stuffing the floss down next to the jewel. It will also be used for prying the rubber feet off the bottom of the Xbox and for prying little metal tabs back to remove a heat shield. |
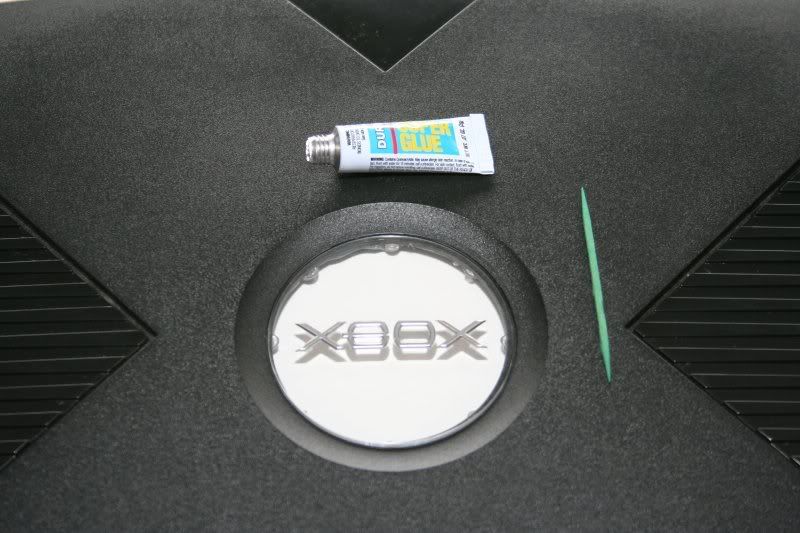
| Brasso Metal Polish | 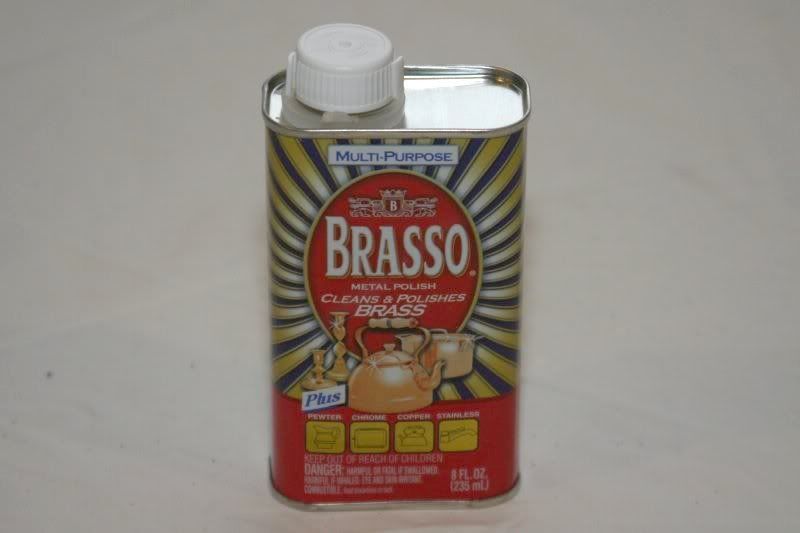
| An 8 oz can was $3.79 after tax at my local Ace Hardware. |
| Old t-shirt, sheet or micro-fiber cloth | 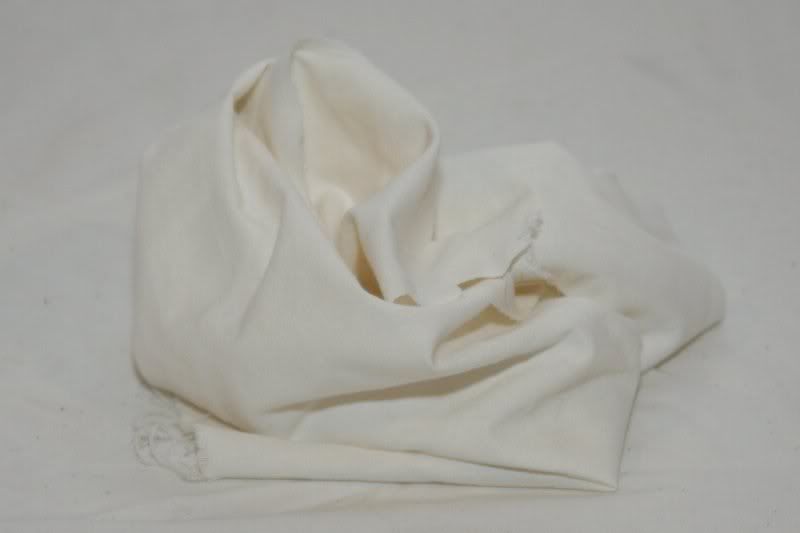
| This will be used for polishing the jewel to make it clear and smooth. As long as it's not a paper towel or something course, you'll be fine. |
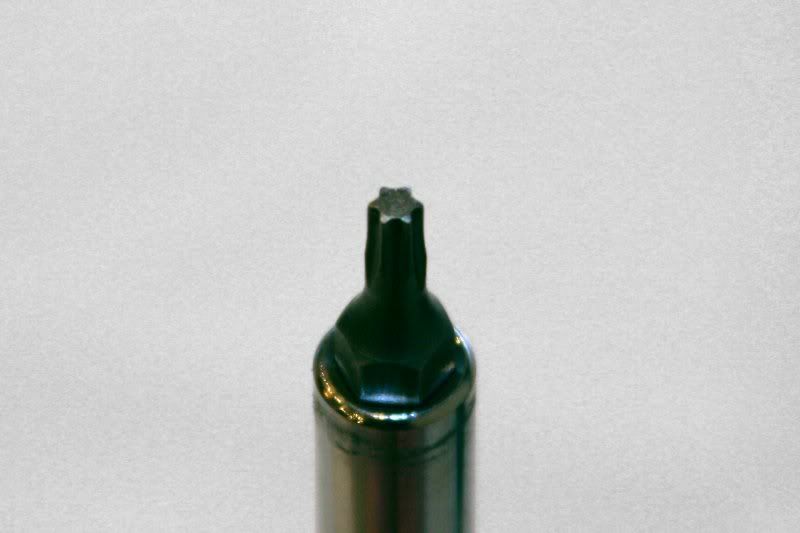
| Torx T-20 Screw Driver | 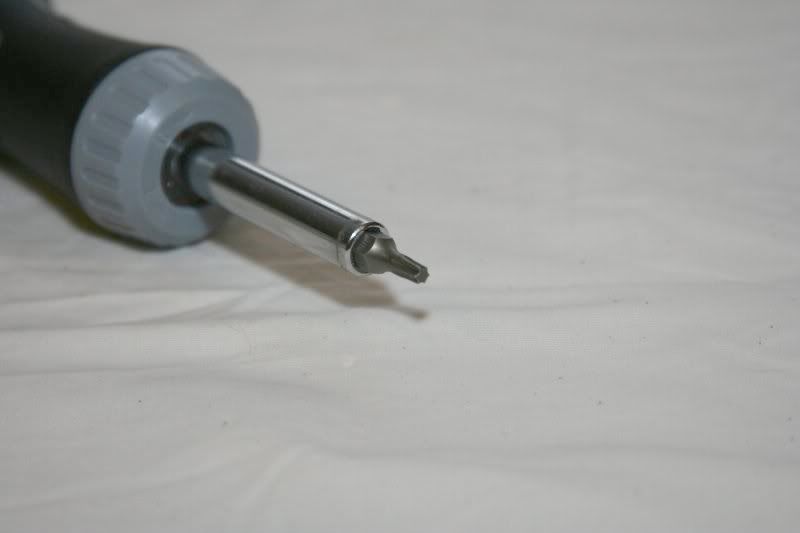
| These are the star shaped ones. If you don't have one, they're cheap at the hardware store too. The "T-20" is simply a size. |
| X-acto or really sharp pocket knife | 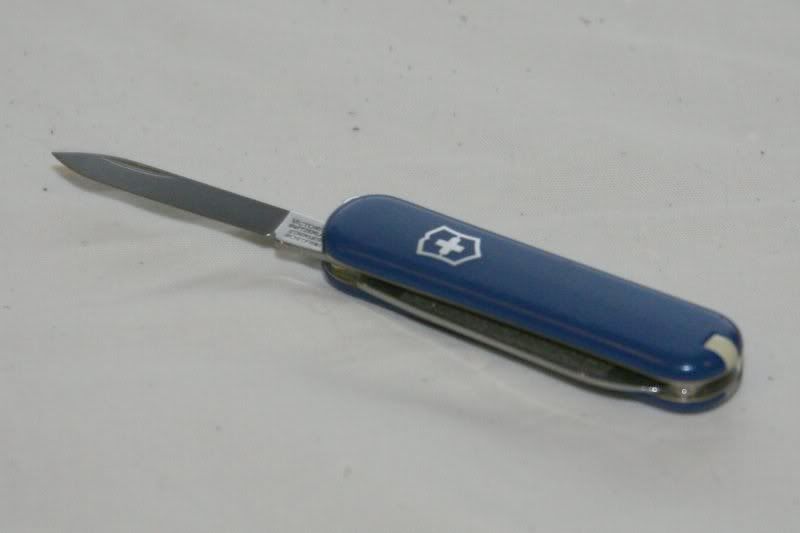
| This is for gently removing stickers. Though not strictly required, it sure is nice. |
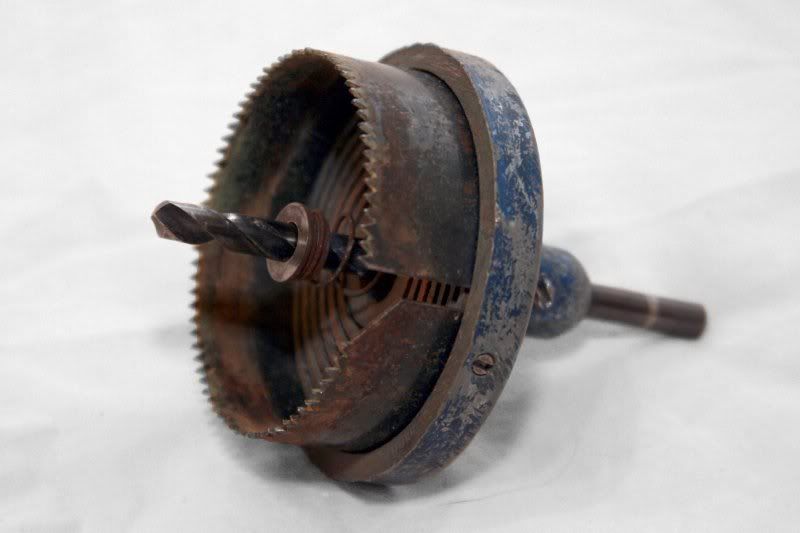
| 2 1/2" Hole Saw (and the drill to run it) | 
| You will need this to cut a hole below the jewel. It's simply a huge attachment for a drill. They're semi-reasonable at a hardware store (about $15 at my local Ace Hardware). If you don't have one of these or don't want to spend the money, a Dremel® tool can work...but it's a lot harder and prone to far more mistakes. This hole saw will give you very little room for error. If you're nervous, consider using a 2 3/8" instead. |
| 1/8" Round File (optional) | 
| This is really handy for marking the positions of the LEDs (using this diagram.) It's totally optional, however. You can mark the positions of the LEDs any way you choose. |
| Hot Glue Gun (with glue) | 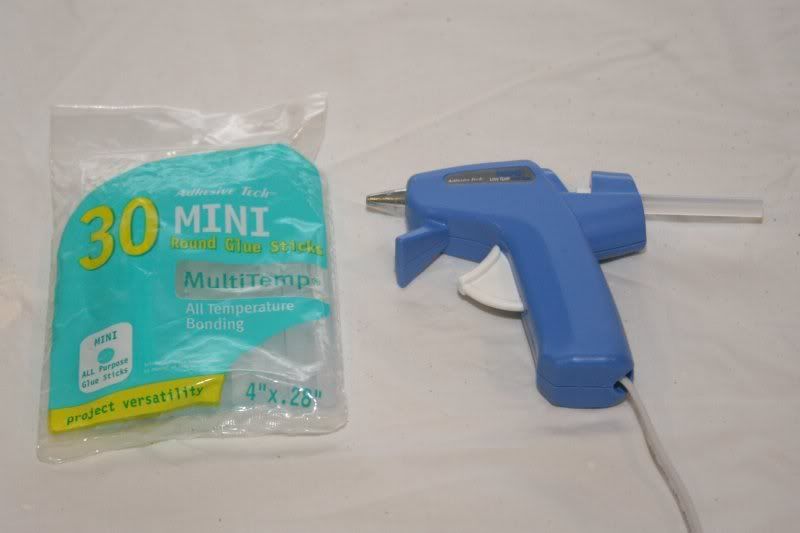
| This is how you will attach the LEDs. It illuminates very nicely when the LEDs are on, too, providing a nice even light. Be careful! Hot glue won't really injure you (permanently) but it hurts like the dickens if you get it on you and can leave some pretty nasty burns. |
| Eight 3mm "Super-Bright" Green LEDs | 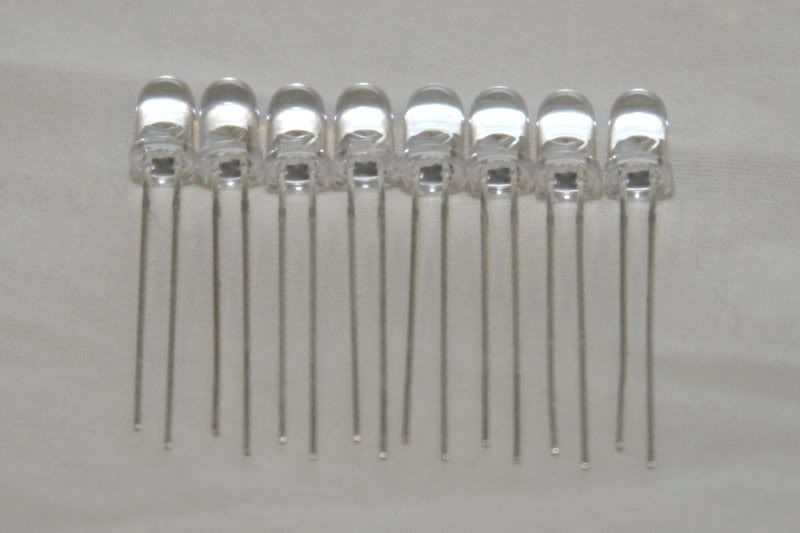
| Really, any LED will do, I just prefer green since it kind of goes with the whole Xbox theme, and I like to get the super-bright ones because it's just cool :-) (Note: I realize these LEDs pictured look clear, and in fact in real life they are clear, but they light up green...and that's the important thing.) |
| Eight Resistors | 
| You'll have to calculate exactly which resistor you'll need based on the power requirements for the LEDs. The power source will be 5V from the Xbox power supply. |
| 14-18 gauge stranded wire | 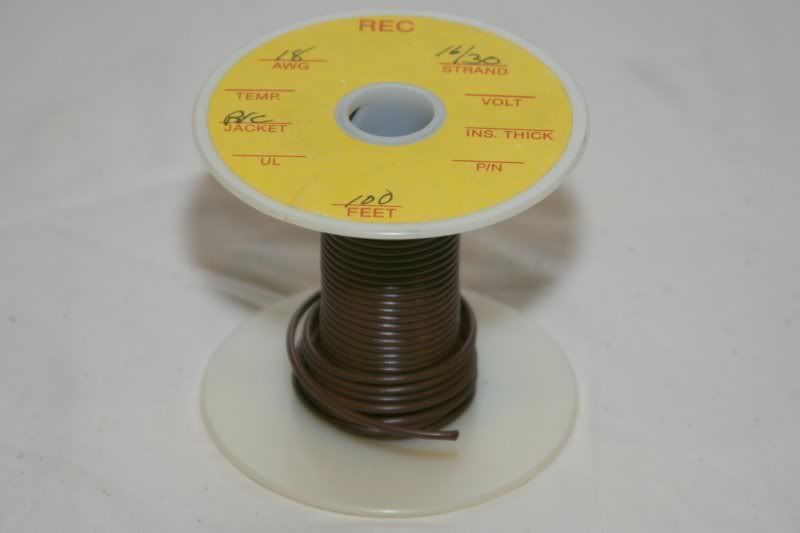
| This will be used for connecting all of the LEDs to power. Thickness of the wire isn't too important in this case; we're just looking for "not too thin and not too thick." |
| Needle-Nose Pliers | 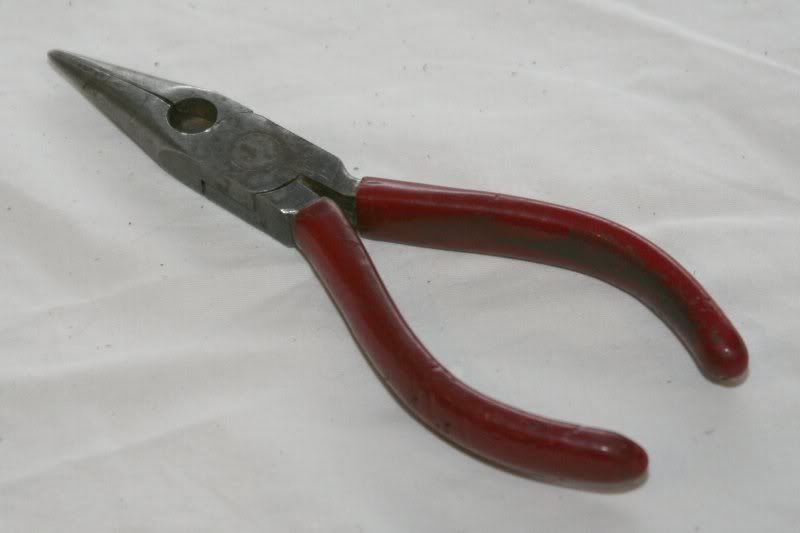
| These can come in handy for carefully bending the leads of the LEDs or resistors for more convenient soldering. |
| 15-35 watt Soldering Iron + solder | 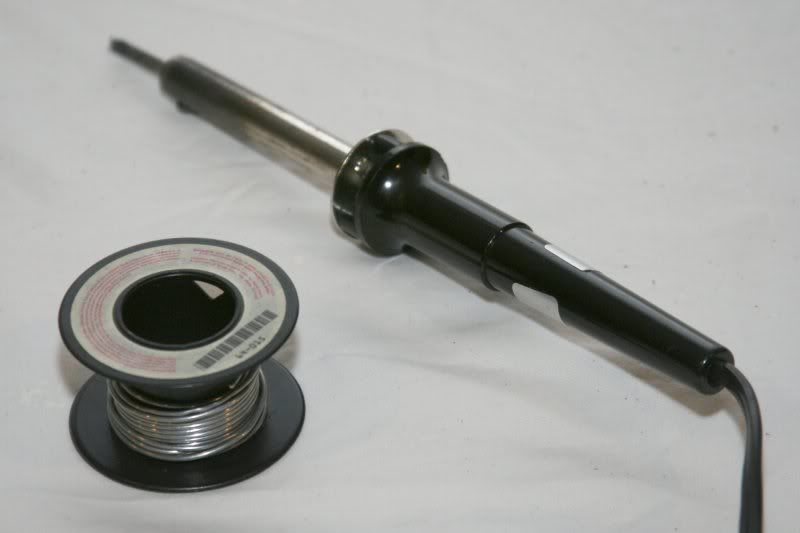
| DO NOT use anything more powerful than this. If you do, don't come crying to me when you fry your LEDs, melt a hole in your case, cause global warming or worse. Be sure you also know how to properly use one of these. If you don't, then get someone who does to give you a hand. |
| Electrical Tape | 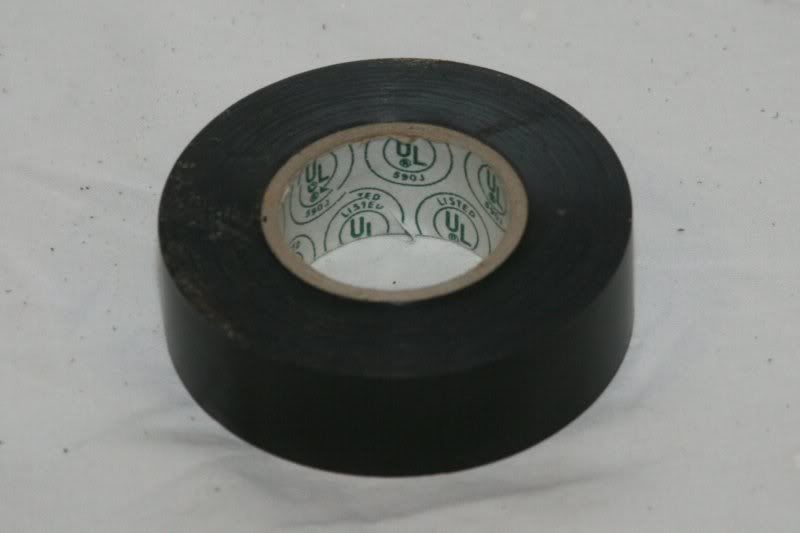
| This is used to seal up some solder points, but it is also used as a nice soft cover for some sharp edges that will be made by cutting the heat shield. |
| Heat Shrink and a Hair Dryer (optional) | 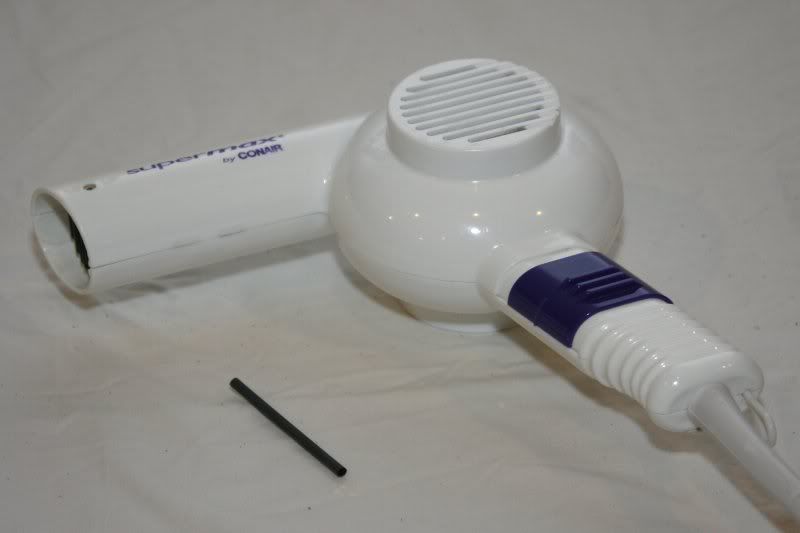
| You can optionally choose to use this for covering the soldered wire instead of the electrical tape. This is my personal preference, since it is very neat and easy to use and makes a nice clean cover. If you don't have any, though, electrical tape works just fine. Your local electronics or hardware store should have these available. |
| Tin Snips | 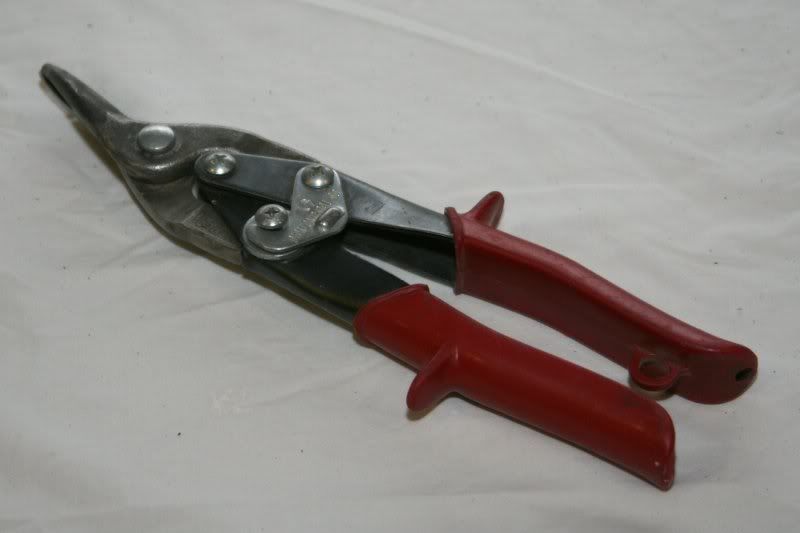
| These will be used for cutting a small hole in the heat shield. You could use a Dremel® tool for this part, if you're careful and wear eye protection. |
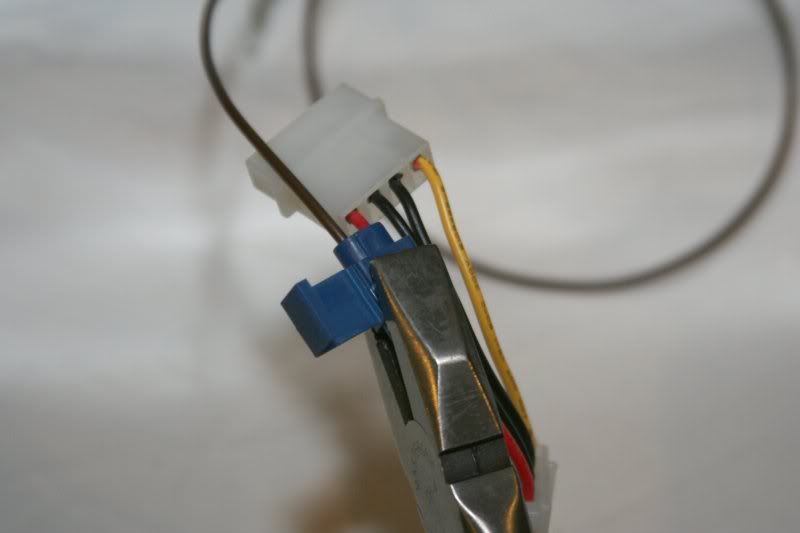
| 4-Pin Power Cable Extender | 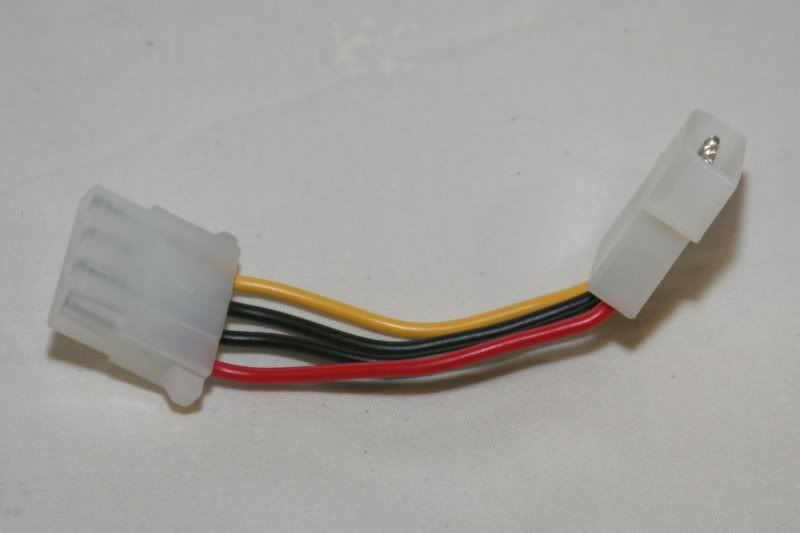
| This is essentially just an extension cord for the 4-pin power-supply cable inside the Xbox. The reason for using it is so we don't have to modify or damage any of the wires inside the Xbox itself...we can always take this out later if something goes wrong :-) |
| Tap Splice Connectors | 
| These are handy little gadgets for splicing a new wire to an existing one without cutting the original wire. They require no soldering and literally snap into place. They can be found reasonably cheap at your local hardware store. |
| Box-Nose Pliers | 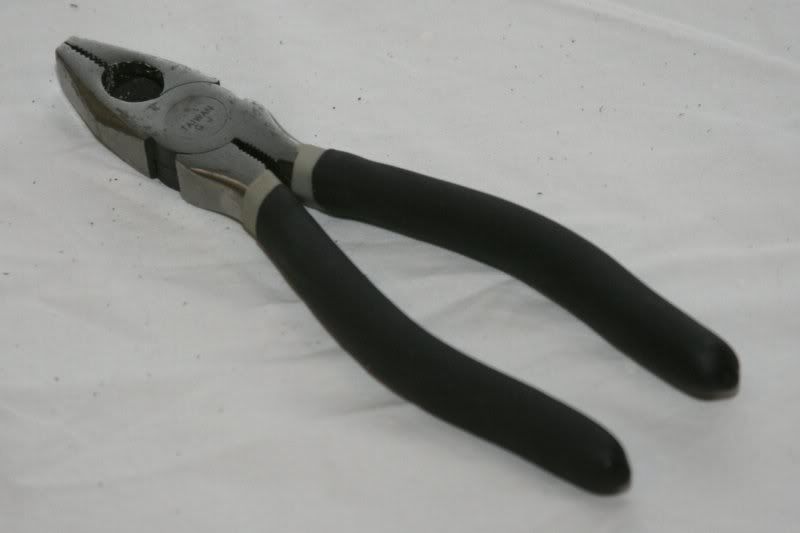
| These are used to close the tap splice connectors. In all actuality, any type of pliers will do, but these work quite handily. |
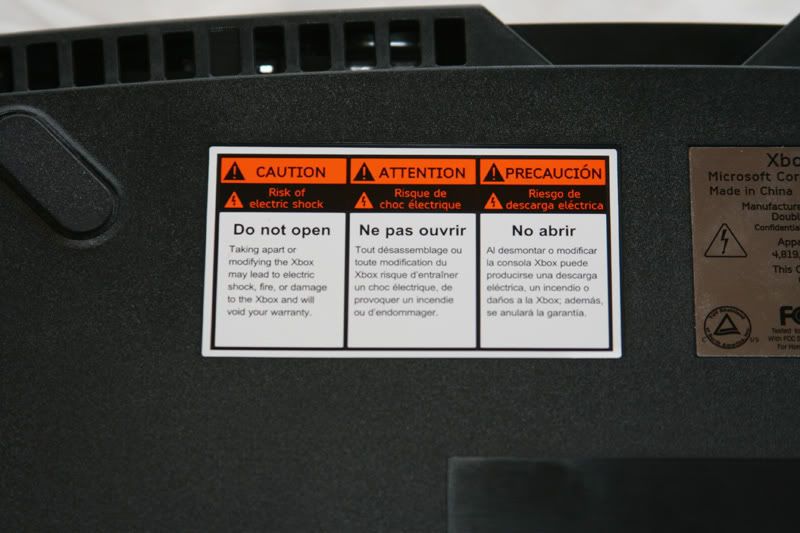
Obligatory Disclaimer:
I take absolutely no responsibility whatsoever for any damage you may cause to your Xbox, personal, public or borrowed property, or injuries you may receive by following any instructions contained in this tutorial or any like it. The modifications detailed in this tutorial are not supported by Microsoft® or any of their affiliates and will void your warranty if attempted.
Remember, whenever attempting any electrical work of any kind there is a risk of electrical shock. Also, whenever working with electrical tools such as (but not limited to) drills, Dremel® tools, hot glue guns or soldering irons, be sure to wear protective eyewear and clothing at all times. Please read the instruction manual before attempting to use or operate any tools involved in this tutorial.
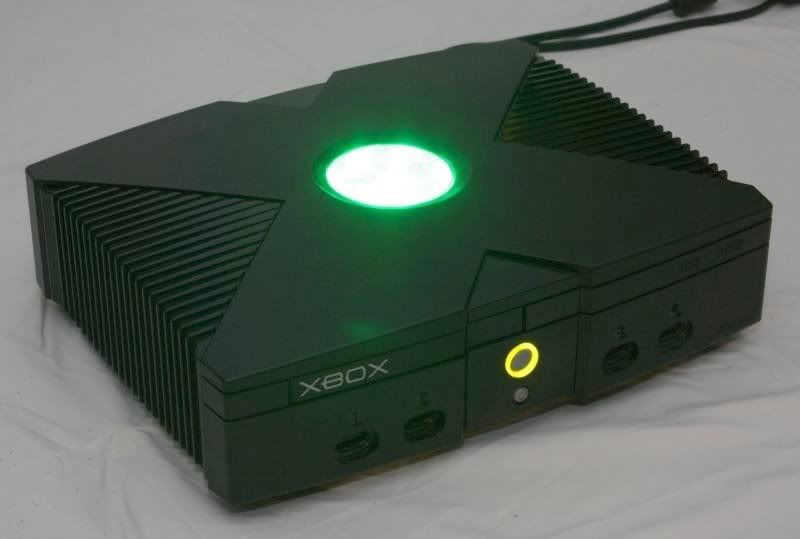
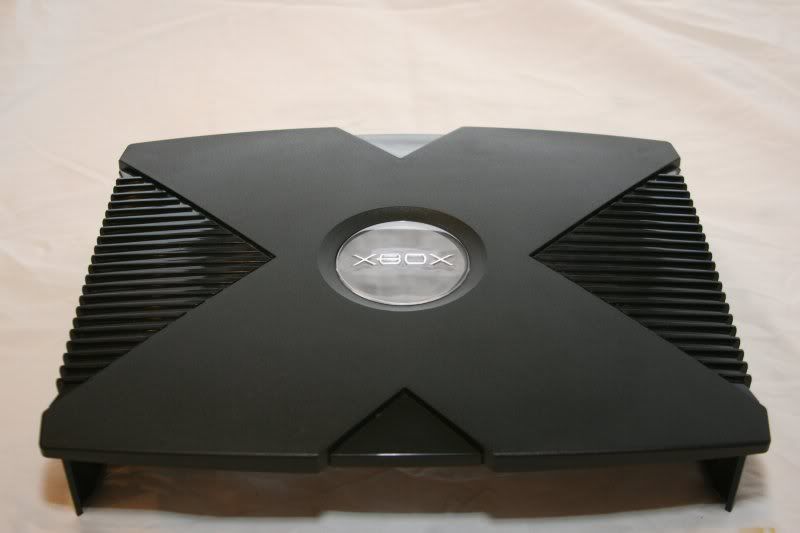
Ok, with that out of the way, today we're going to be modding an Xbox so that the jewel (the big, green, plastic logo in the top) lights up a with a brilliant green light when the Xbox is on instead of what it does normally...which is nothing. I know there are dozens of tutorials online about how to do this, each with their own methods, madness and baseless claims, (and to each their own) but in this tutorial I will attempt to walk you through every last single nit-picky step without leaving anything out or assuming that you have one ounce of skill...ok, maybe one ounce, but certainly not two.
First step, acquire an Xbox. Go ahead, I'll wait here.
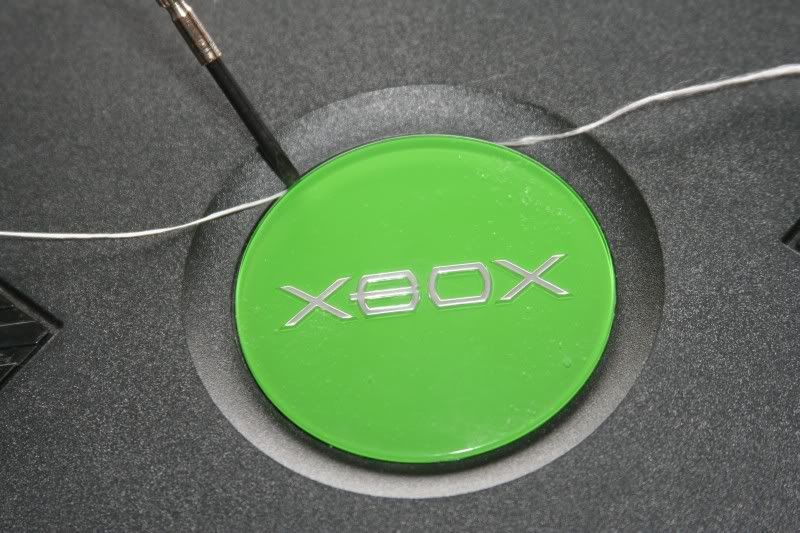
Back already? Good. Let's get moving then. I like to begin by removing the jewel; not because it's particularly "better" to do this first, just because the Xbox itself acts as a very sturdy and heavy base so you know your project isn't going to move much on you. I have found that the "floss method" works easiest for me (critics, please notice the "FOR ME" part of that sentence before you begin flaming me and calling down curses upon my family line for daring to speak heresy against the "freezer method" or the "hair dryer and butter knife" method or the "mineral turpentine until you pass out from the fumes method"). I seem to have digressed...the "floss method" is as follows:
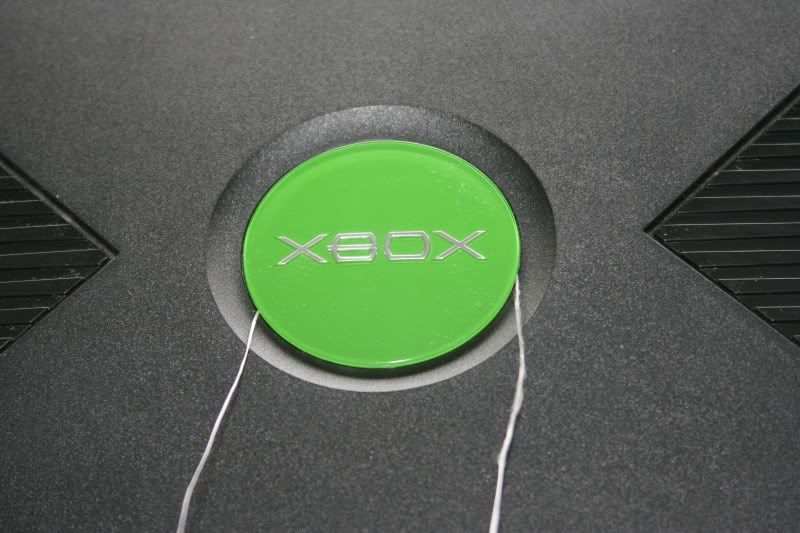
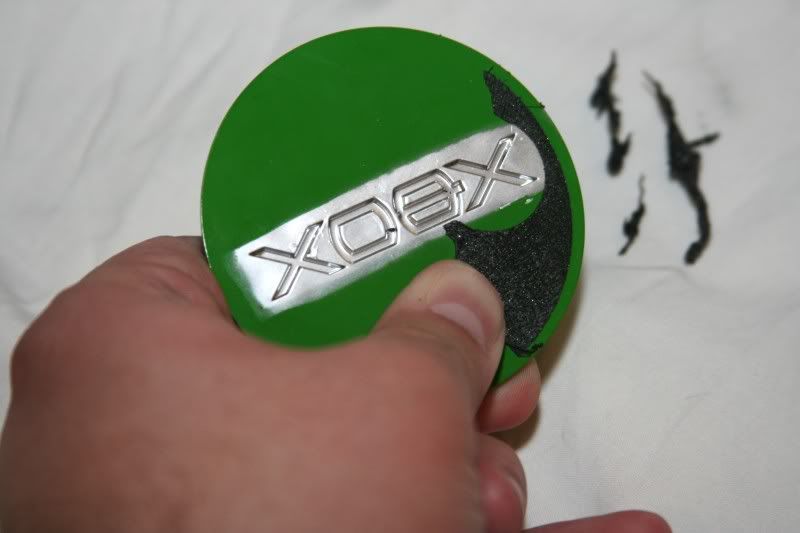
Get a piece of floss and a very small standard screw driver, or a thin fingernail file. I like to avoid sharp things like pocket knives or X-acto knives for this step simply to prevent possibly scratching the Xbox or cutting my floss...or myself for that matter. Carefully push the floss down around beside the jewel as shown for about two inches or so. Don't worry about trying to push the floss under the jewel at all, we'll get to that in a moment.
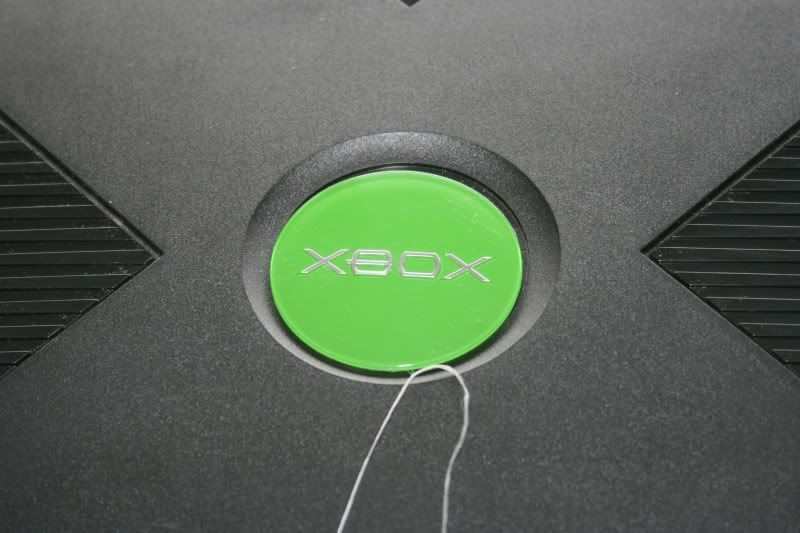
Once you have the floss pushed down in the crack beside the jewel, gently grab the two loose ends and pull slightly until the floss slips under the jewel.
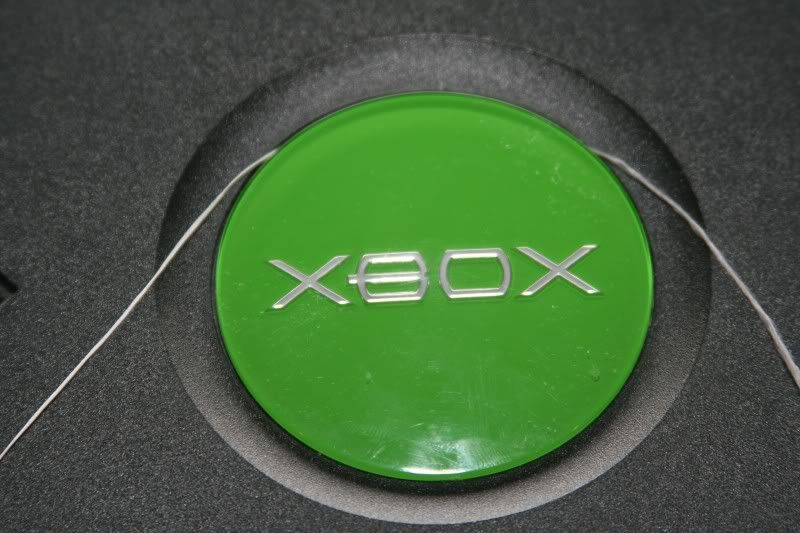
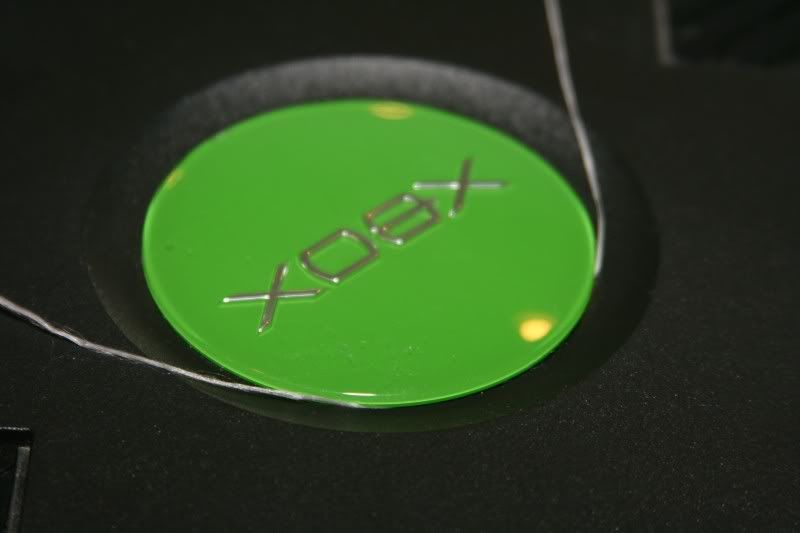
Now you're ready to go to work on it. Wrap the floss around your fingers a few times so you have a good grip on it, and begin sliding it back and forth, slowly pulling under the jewel. Firm but gentle is the name of the game here. Your floss will easily saw through the adhesive behind the jewel, so don't go pulling hard enough to break your floss or worse, your jewel. This step shouldn't take much longer than about 10 seconds...maybe 20...and then "pop," off comes your jewel!
Now, at this point I can almost feel other modders shouting at me, "What about the hair dryer? You have to heat the jewel with a hair dryer first!" So I guess I should address that. If you were using the floss to just cut through adhesive (like carpet tape or something) then yes, the adhesive is way too strong and way too gummy and you'd just end up breaking your floss. Thankfully, Xbox jewels use something a little different. It's more of an adhesive foam than anything. It is essentially two incredibly sticky surfaces held together by a thin layer of padding. It's this middle layer that we're cutting through and trust me, it doesn't stand up to a good piece of Wal-Mart floss.
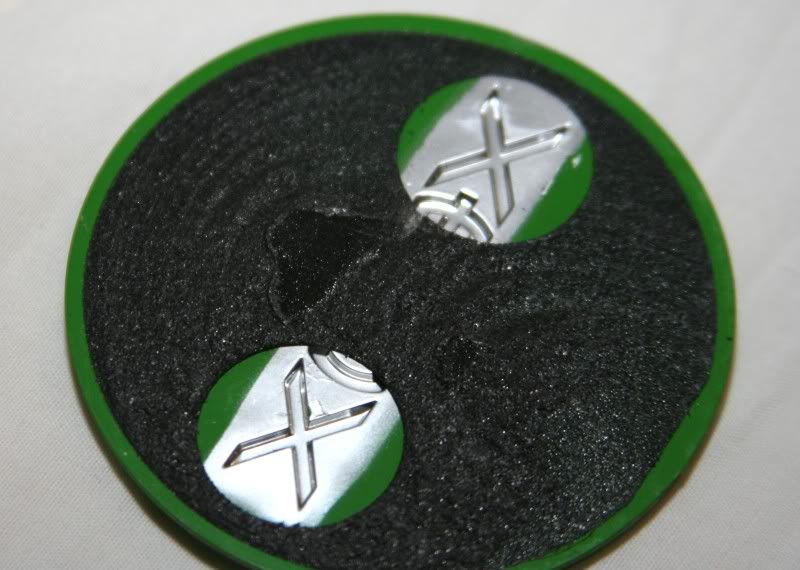
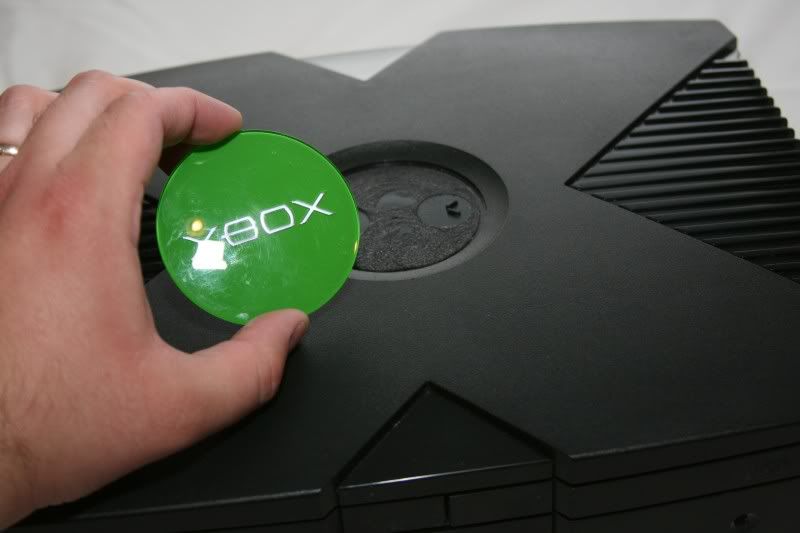
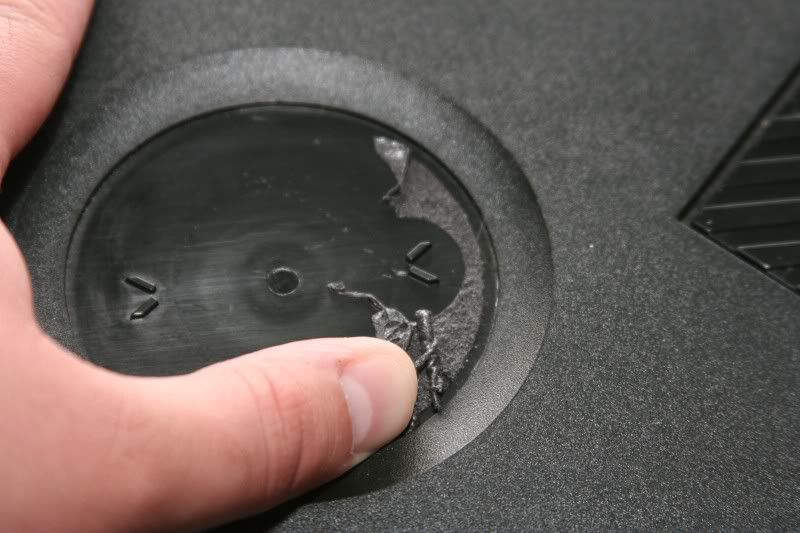
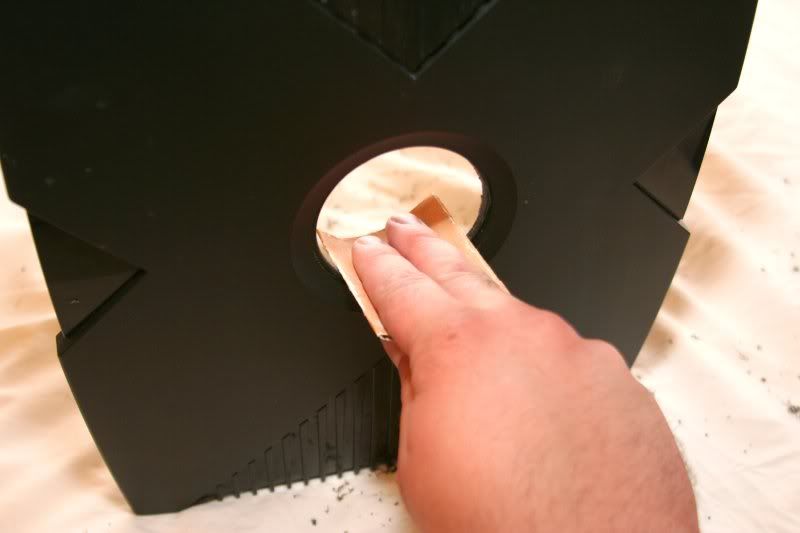
Now that the jewel is off, we get to remove "sticky stuff" from both it and the place where it was stuck. This is yet another instance where everyone and their dog will offer an opinion about how to do it. Some say you should pick with your fingernails. Others say to soak it in lighter fluid or some crazy thing like that for half an hour and then just let it fall off...Well, while they're waiting half an hour for their house to burn down from the sink full of lighter fluid, we'll take five minutes and just rub it off. Simply take your thumb (or whatever finger you prefer) and rub thusly:
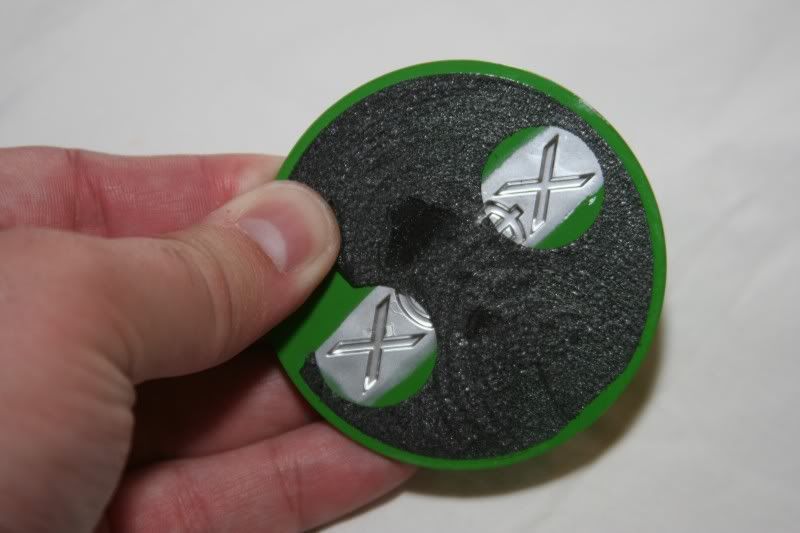
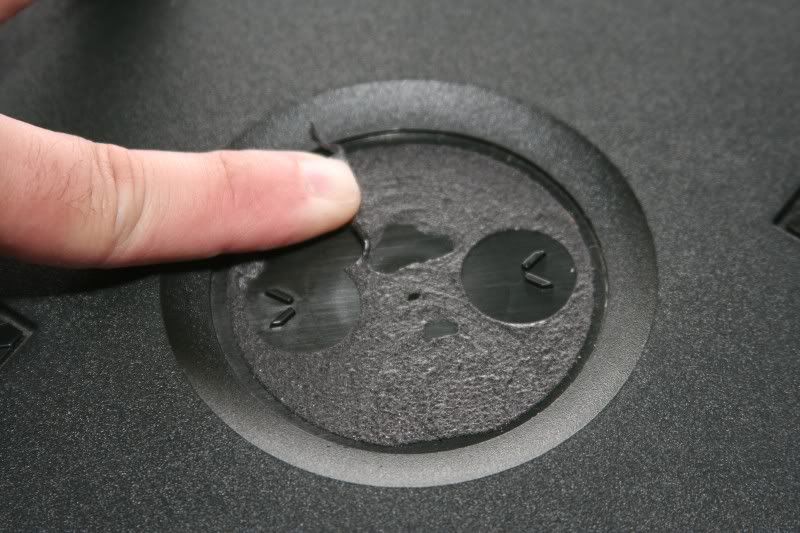
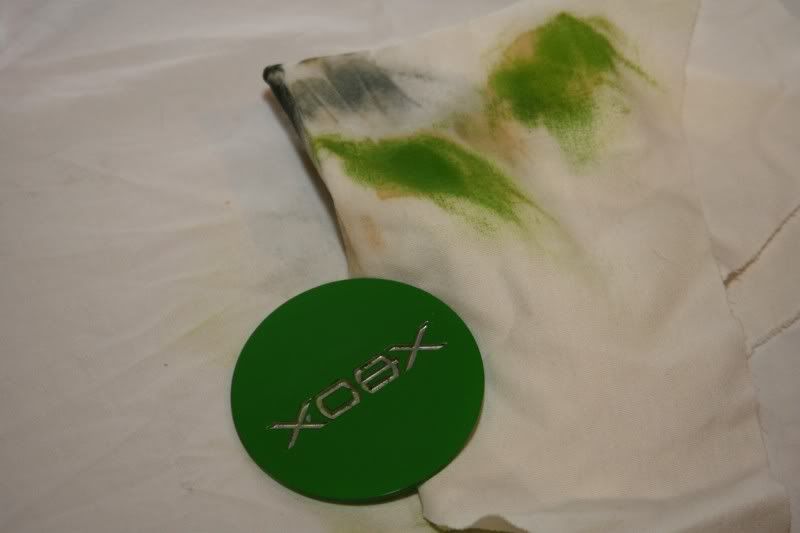
It may take a fair amount of pressure, but the sticky stuff should just roll up under your finger and come right off. It takes some work, and it's not quite as easy as getting the jewel off in the first place, but it's certainly not hard. Remember back in the elementary school days when you would write on yourself with a marker and then try to lick your finger and wipe it off before your mom found out? Same thing...except no licking. Now if you get all of the adhesive off, but there's still a little sticky residue, you can use a little bit of rubbing alcohol on a soft rag (old t-shirt or something) to remove it. Just don't use nail polish remover...it will melt your jewel, and nobody wants that!
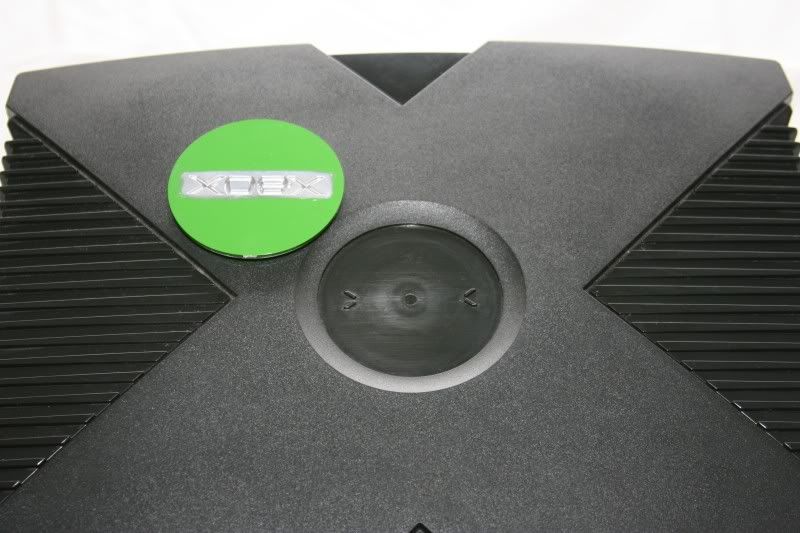
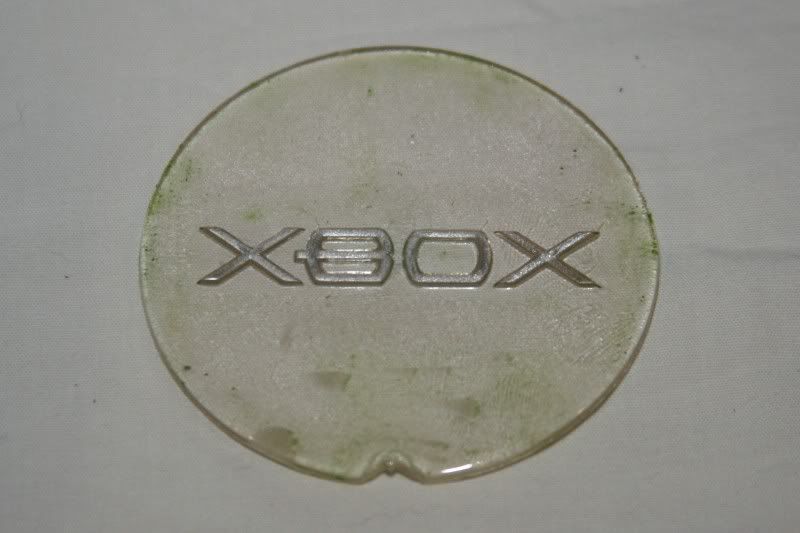
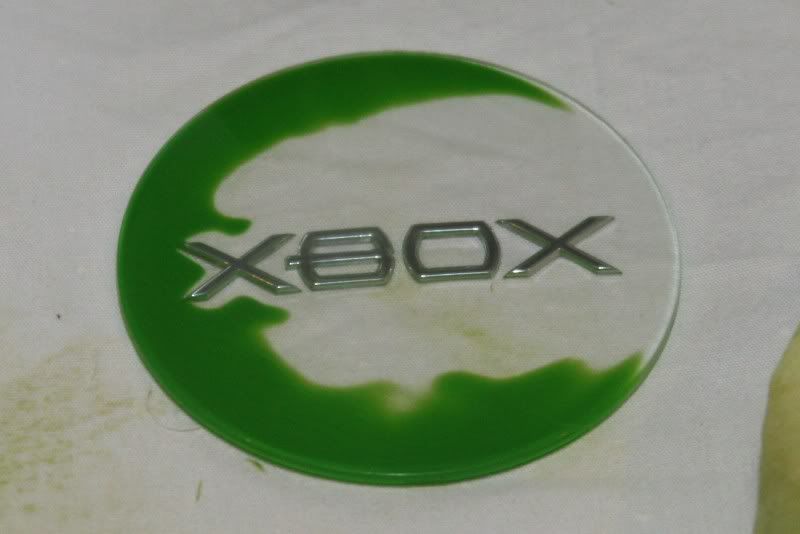
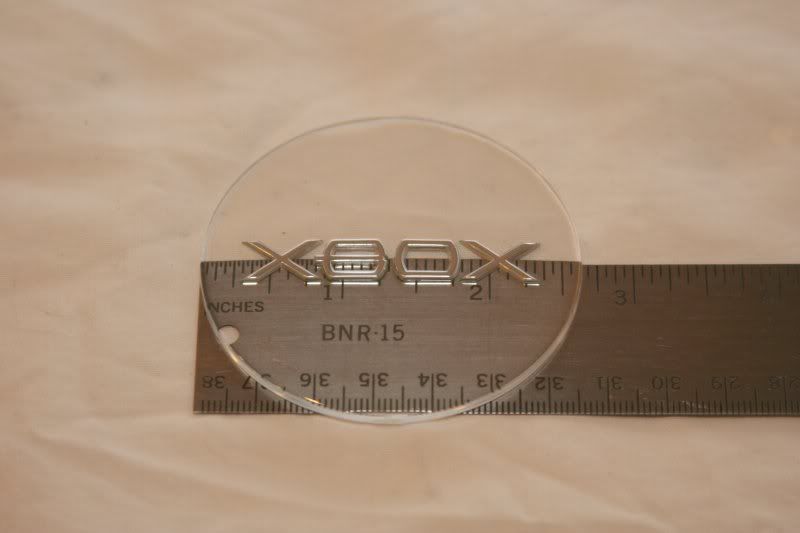
There, now we have a nice clean jewel and a nice spot where the jewel used to be. You've probably noticed by now that the jewel is not clear. In fact, it has a pretty generous helping of tough green paint on the back. The next step I like to do is to remove this and polish the jewel up so it's nice and clear. You could save this for later if you like, but it's going to have to be done eventually, so you might as well not void your warranty quite yet and have some fun cleaning.
The first step to cleaning the jewel is to find a good movie. Preferably something long like "Dances With Wolves" or "Titanic" or even "The Cure for Insomnia." Why's that, you ask? Because this is not a fast process. It requires a fair measure of that dreaded "P-word"...Patience. Now, before you're tempted to try a short cut, allow me to offer some insights. "Non-acetone nail-polish remover" will react with the plastic, making it soft and all you'll end up with is a green-tinted, messy looking jewel with fingerprints melted into it and hideous scratches all over the back...not that I'm speaking from experience or anything :-/
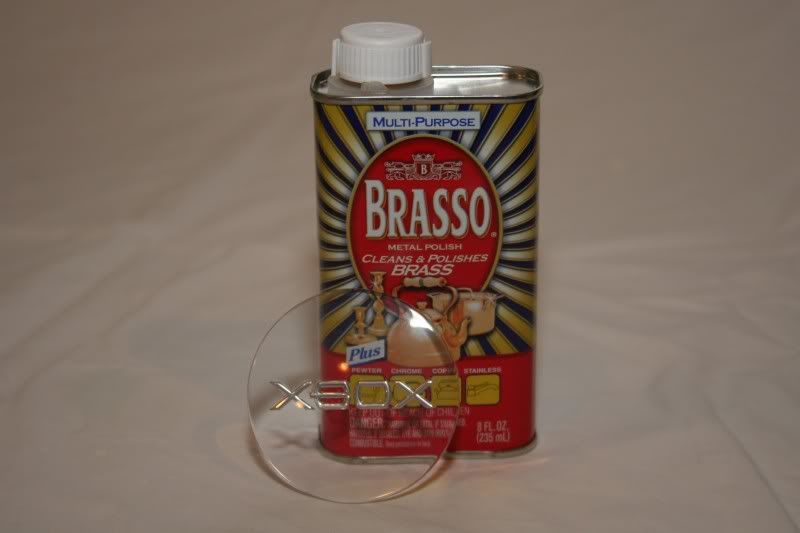
Sanding may seem fast at first, but anytime you're taking off that much material at once, you run the risk of ruining your jewel. Besides that, in order to get all of the sanding scratches out you have to spend at least as much time polishing as you would with any other "slower" method. You can try other various insundry chemicals, but they aren't cheap (they're not that bad, but you can always do better) and with some of the fumes they put out you'll be asking yourself "Will I have children? Will they be normal?" No, the safest and cheapest way that I have found is to get a can of Brasso Metal Polish ($3.79 after tax at my local Ace Hardware), a nice smooth piece of fabric (an old t-shirt is perfectly fine, old sheets are better, micro-fiber polishing cloth is awesome), sit down and start polishing. Be sure to follow the directions on the back of the Brasso can (shake well before use, etc), and do this in a well ventilated area. This stuff is nasty smelling and you don't want to be breathing too much of it.

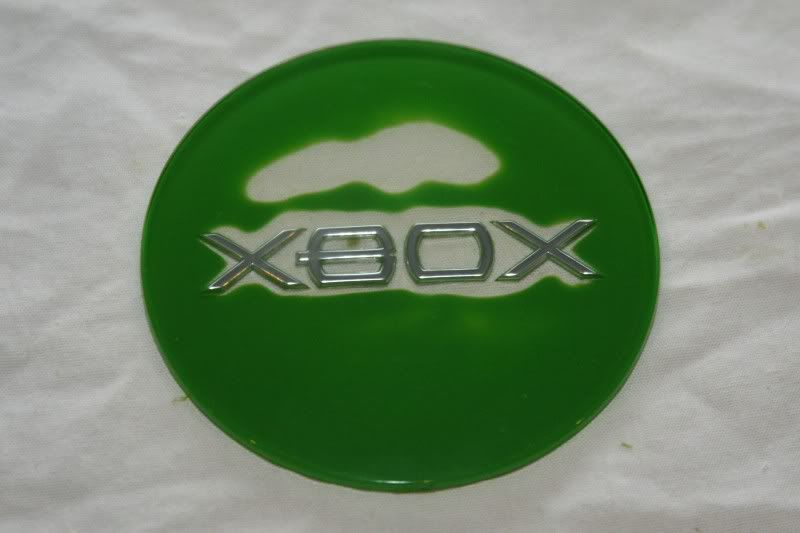
It doesn't take much Brasso at any given time. You can use a Q-tip to get a few drops on the jewel or just hold your rag firmly over the mouth of the can and tip it upside down briefly. Either way, a little bit is all you need and you can start gently buffing. You won't see much progress at first, but one thing you will notice pretty quickly is that your rag is turning green. To those of you who feel that because you can't see progress there isn't any, allow me to interject some logic: Your rag is turning green...where do you suppose that green is coming from? Is it your hands? No... Is it the air? No... Is it, the paint coming off the back of the jewel like I said it would? Yes!

Anyway, keep at it.
Slow and steady and all...
Rome wasn't built in a day your know.
Nor shall your jewel be polished in one.
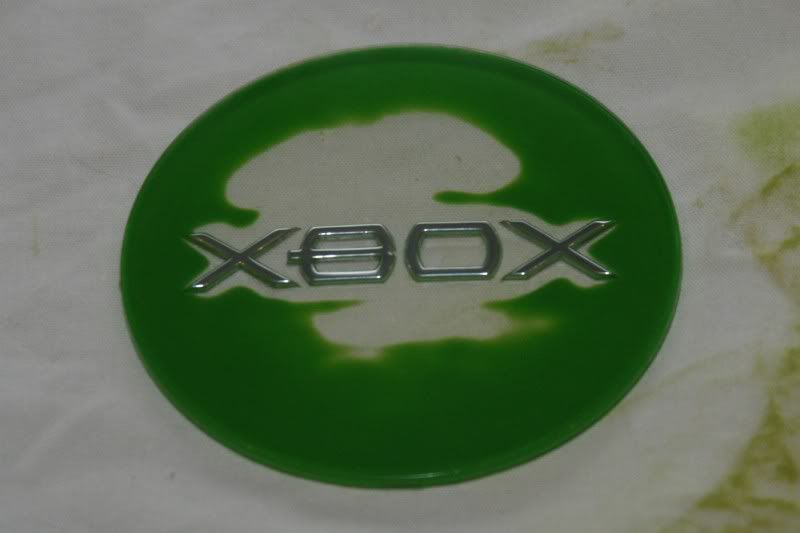
AT LAST!
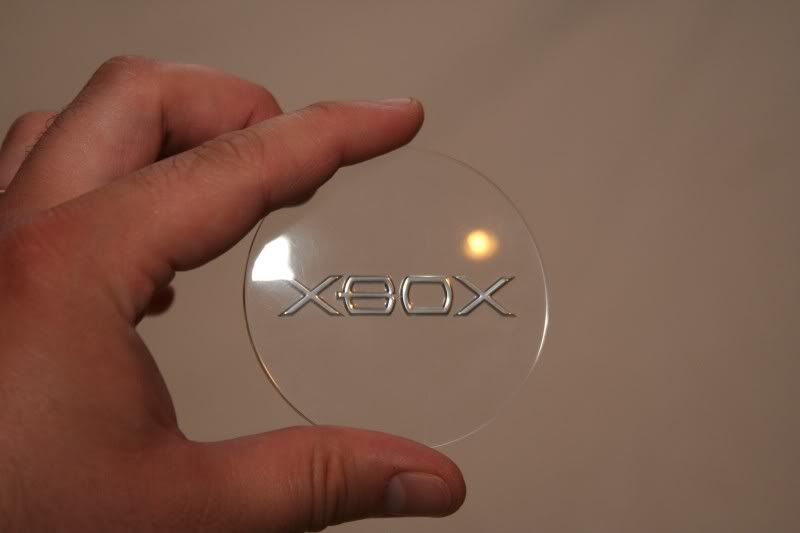
If you've been gentle and diligent, you should have a beautifully polished jewel with the silver still in the letters. If you want the silver out of the letters...well...use a Dremel® tool or a blow torch or something, I don't know. Seriously, I've never bothered to take the silver out of the letters, but my experience tells me that an incredibly patient and gentle person could do it with some more Brasso and a toothpick.
Well, we've forestalled this moment for long enough. It's time to void your warranty and crack open that ol' Xbox. (Note: If you chicken out at this point, some rubber cement will put your jewel back in place and you can go on with life never knowing the difference...except that your jewel will be as clear as glass and you'll have to explain to all your friends why.) So with that, flip your Xbox upside down and lets get to it!
At this point, I should probably say something again about your warranty. You are going to void it and never be able to send your Xbox to Microsoft® for repair again by doing this. There are plenty of tutorials out there explaining how to carefully remove the feet of the Xbox and the stickers that cover the screws and put them back so no one will notice...but you really have to ask yourself: won't the bright glowing light in the top that wasn't there before give it away? I mean seriously...lets say you manage to disassemble your Xbox, complete this mod and put it all back together again such that Sherlock Holmes himself could not tell that you'd removed and replaced the stickers and feet...they're still going to notice that it doesn't look like any of the other Xboxes in the world! The fact that it glows will kind of give it away. That said, if you would like to be careful so that the bottom of your Xbox still looks nice, then here we go :-)
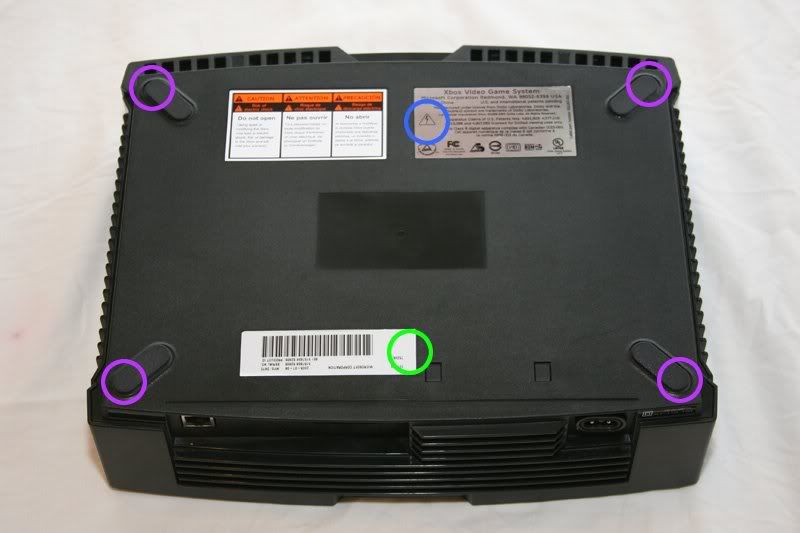
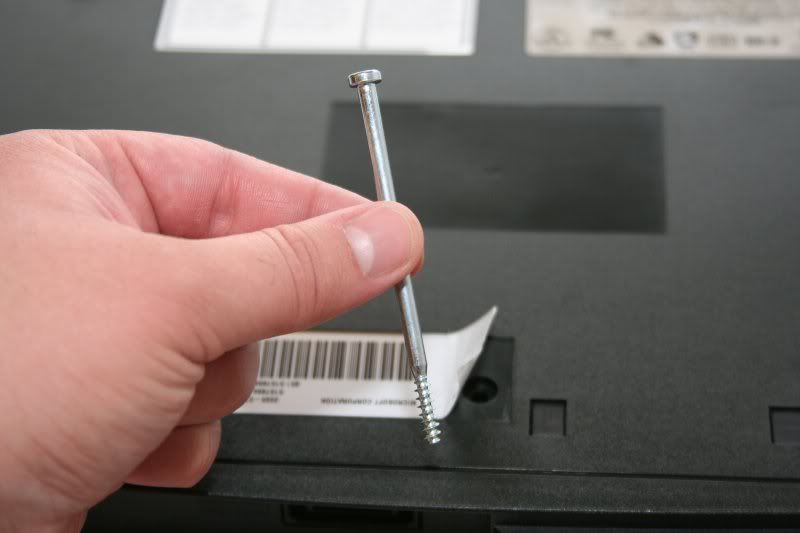
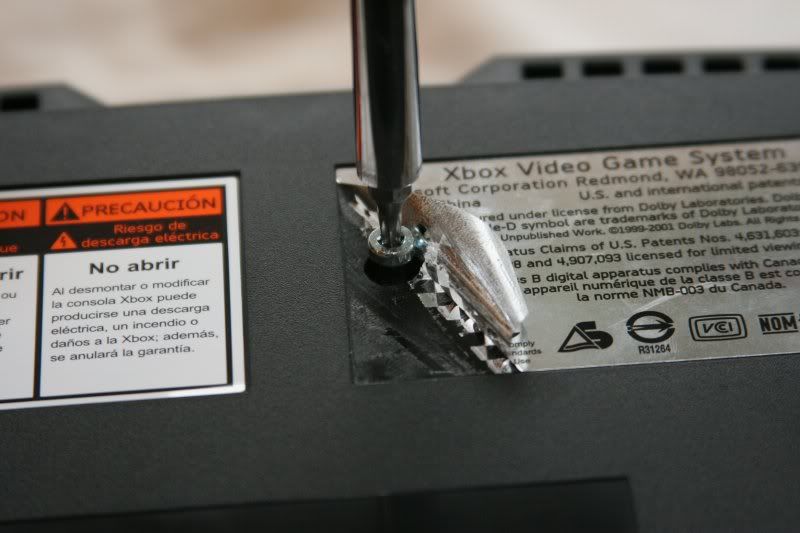
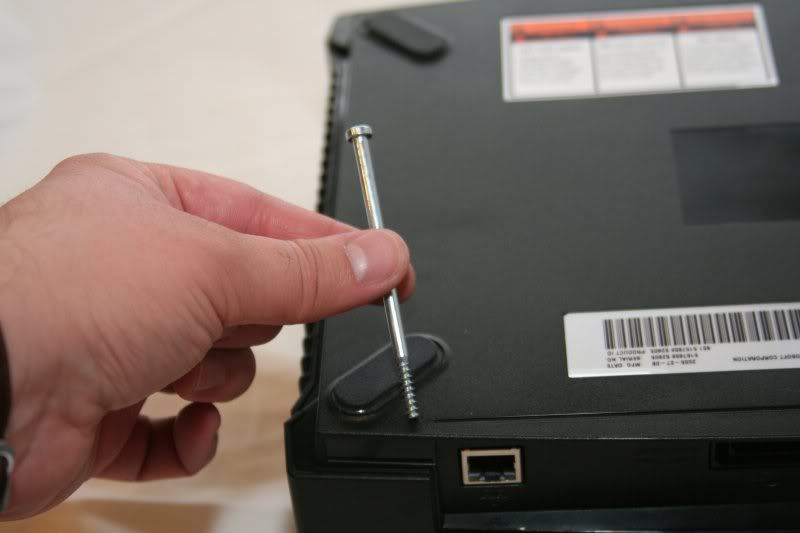
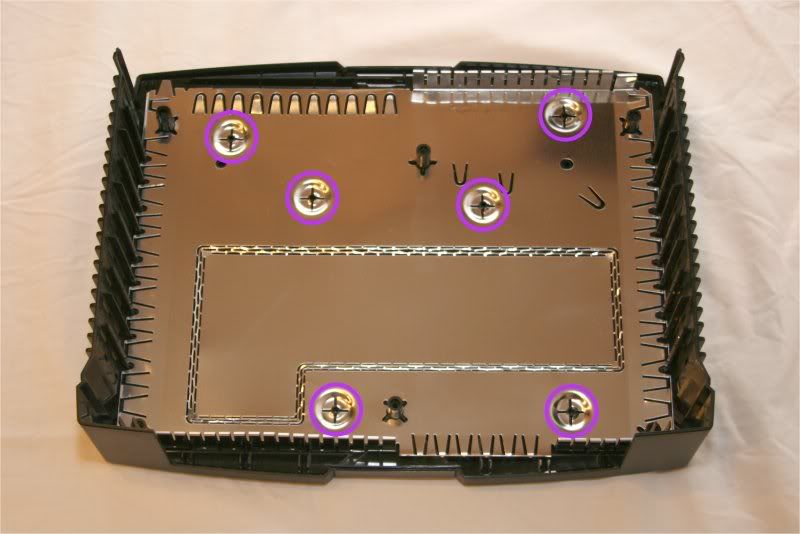
I like to tackle the hard screws first so that as time goes on my job just gets easier. There are six screws total: one under each rubber foot, one under the left side of the silver "Xbox Video Game System" sticker towards the top-right as you're looking down on the belly of the Xbox and one under the right side of the barcode sticker at the bottom.
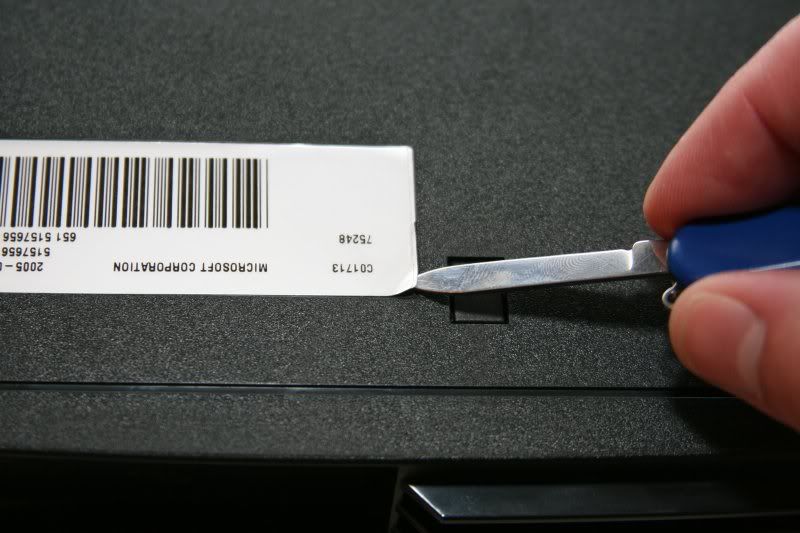
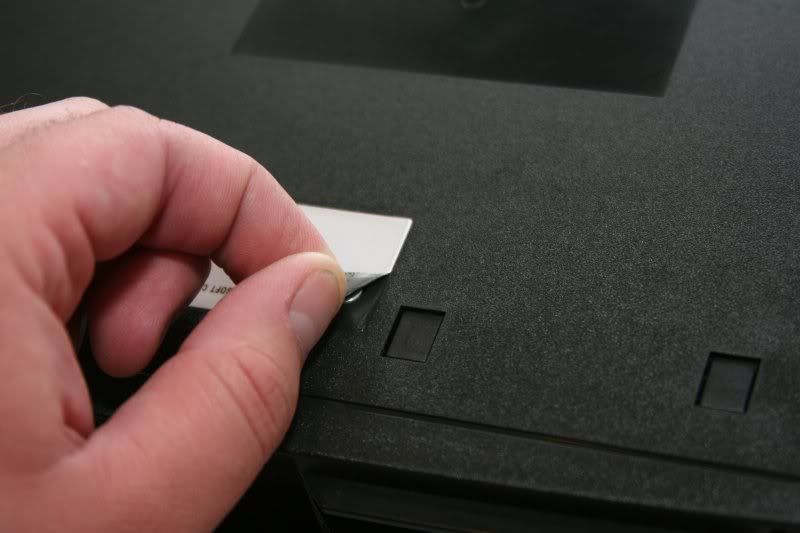
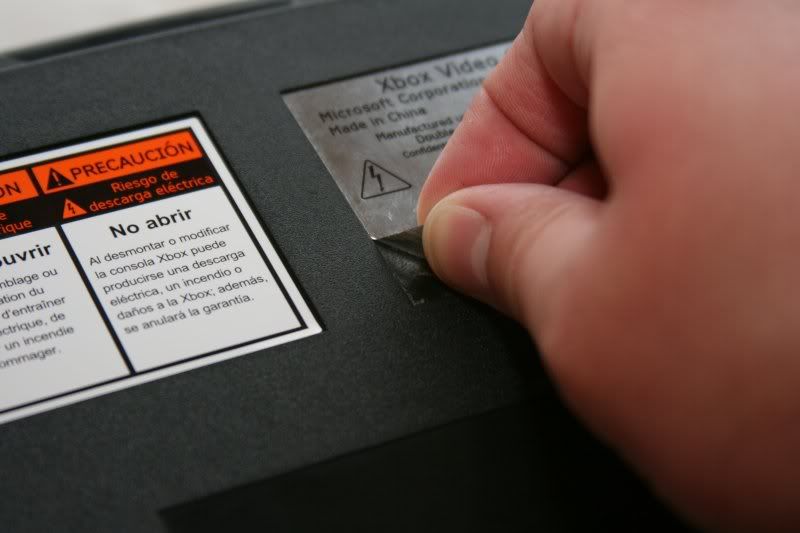
Using an X-acto or very sharp pocket knife, carefully start pealing one of the stickers back. Be sure to not work the blade too far under at once. Just gentle, steady strokes to "encourage" the sticky part to let go. Once you have enough to pinch onto, pull very gently, using the knife when necessary to free stubborn areas until the entire screw is uncovered.
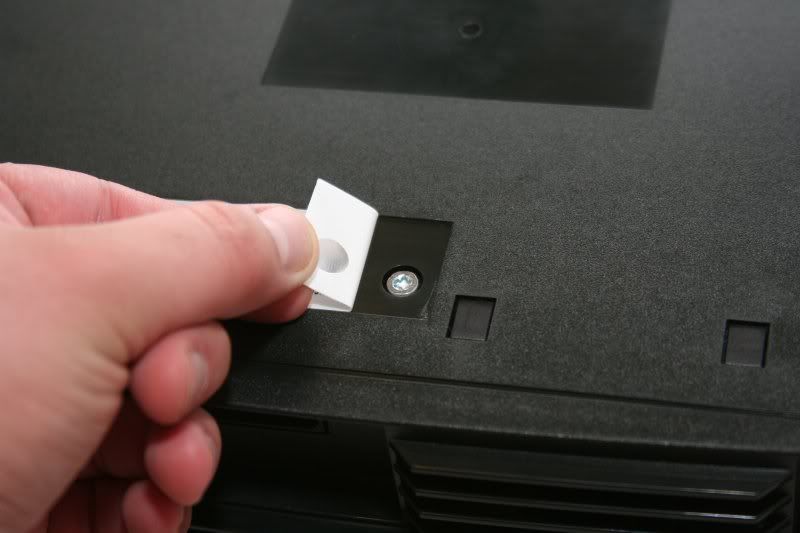
Now simply use a Torx T-20 screw driver (that's one of those star-shaped ones. The T-20 is just a size.) to remove the screw.

Repeat for the other sticker.
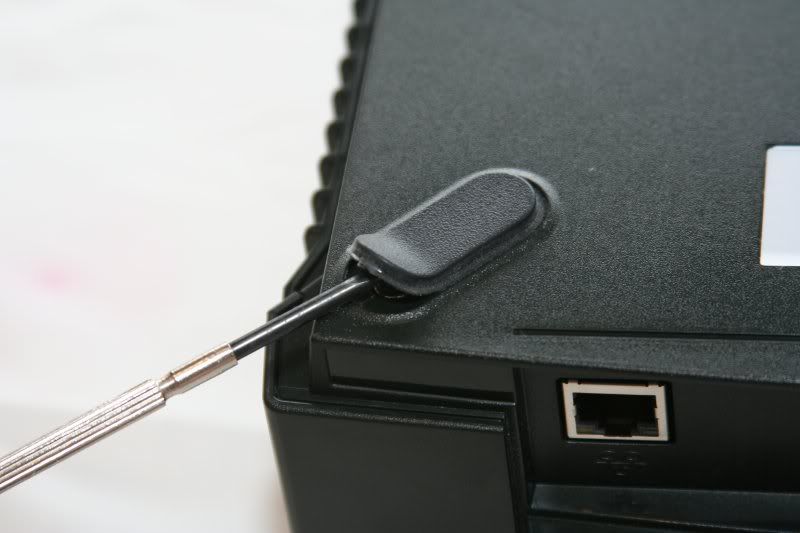
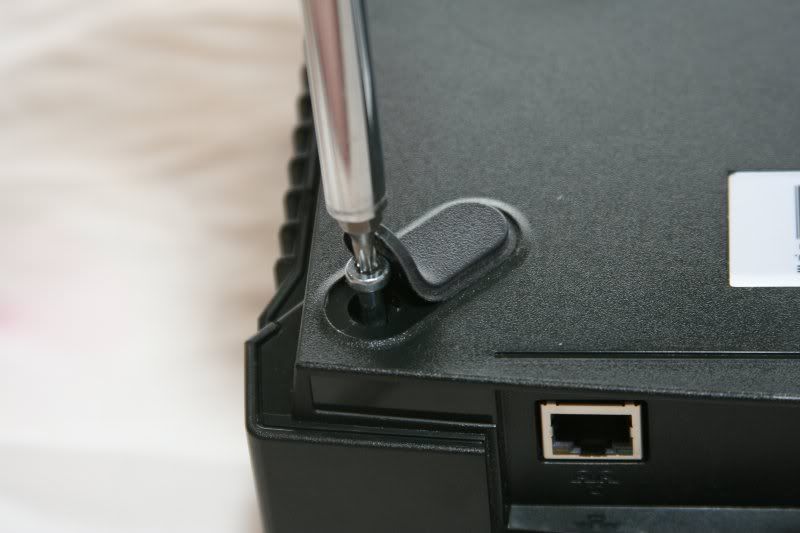
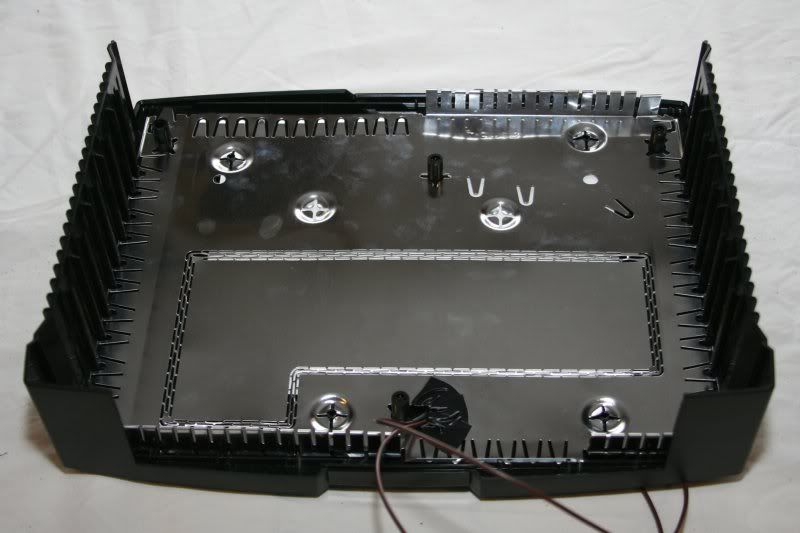
As a note, I like to gently put the stickers back where they were over the screw holes. Don't press them down, just roll them back into place to keep them from getting fuzz or dust on them. Now to attack the feet. You can either use a fingernail file (or something not sharp so as to not cut the feet or the plastic) or simply use your fingers and pick at them. It's not necessary to pull the feet completely off, in fact you probably shouldn't so that most of the "sticky" stays in tact. Just pry the feet back far enough (starting from the outer corner of the Xbox) and remove the screws. It's ok to let the feet spring back into place once the screws are out.
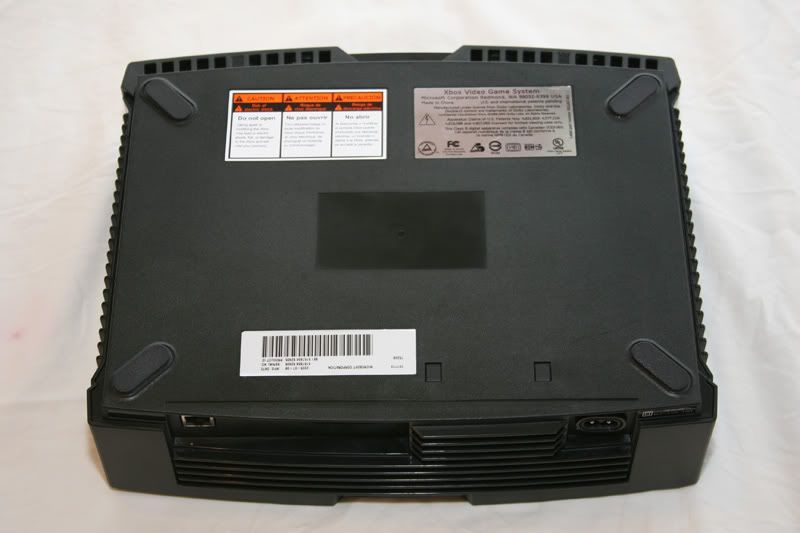
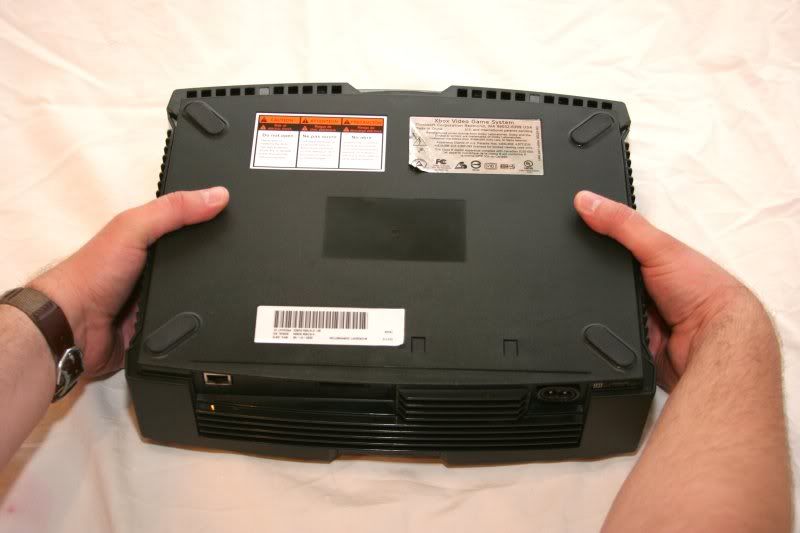
Once you have all six screws removed, rubber band them together or put them in a plastic baggie or something so you don't lose them :-) Now hang onto the Xbox, being sure to have some fingers above and some below it, and turn it right-side up again. The reason for hanging onto the top and the bottom is because the case separates vertically, so if you just nonchalantly flip it right-side up again, your going to dump the guts out all over your table and then you'll have a fine mess. (Alright, I realize everything is actually secured in the Xbox pretty good, but it certainly won't do it any good being dropped on the table.) Now simply lift the lid straight up and it should separate from the bottom nicely. (You may have to jiggle and twist it ever so slightly.)
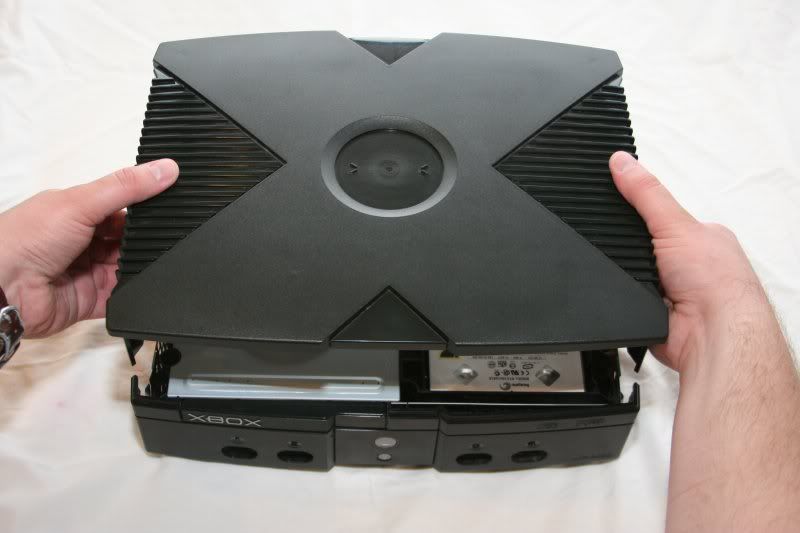
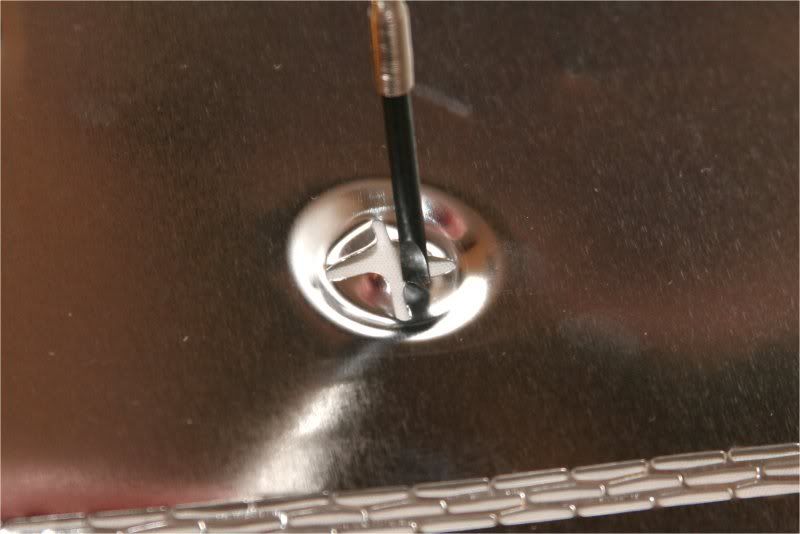
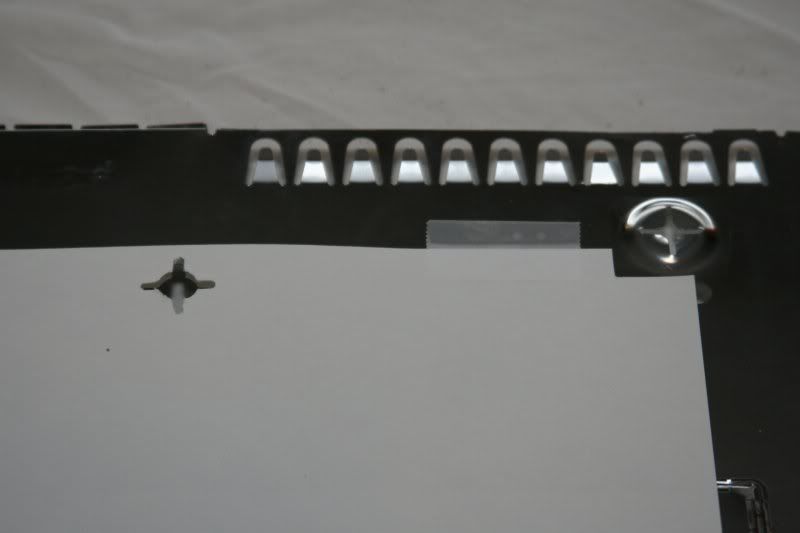
Now, if you flip the lid upside down, you'll notice that it has a heat shield on the bottom of it...sounds pretty impressive, huh? Alright, it's actually just a piece of metal they stuck to the plastic to keep the heat from the hard-drive and DVD-ROM from heating up the plastic. But you gotta admit, "Heat Shield" sounds soooo much cooler. Anyway, we need to pop this off. There are six little tabs that hold the heat shield in place. Simply take a small standard screwdriver and gently pry these back just far enough to let go.
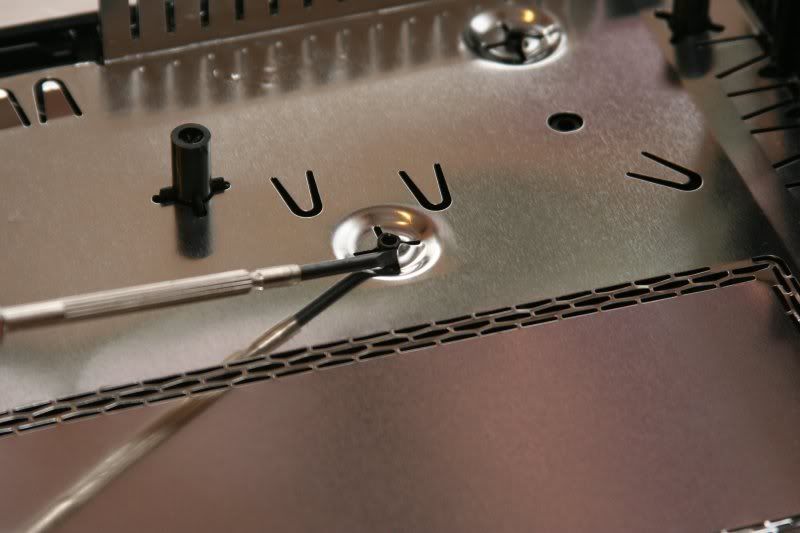
Once the heat shield is off, set it on a nice, flat surface and gently push the tabs back down so they will grab again when you put the heat shield back on later. You can use the standard screwdriver to do this if you like. Just about anything small, blunt and rigid will do fine.
Alright, deep breath, now it's time for some real action :-)
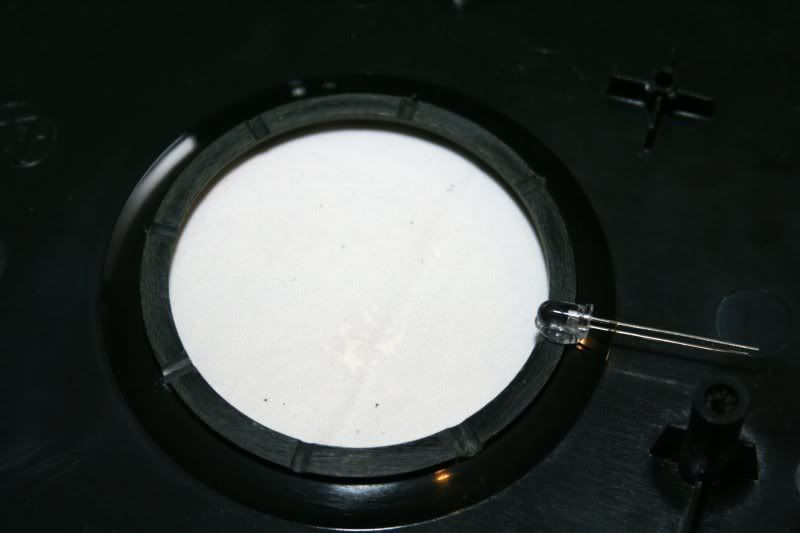
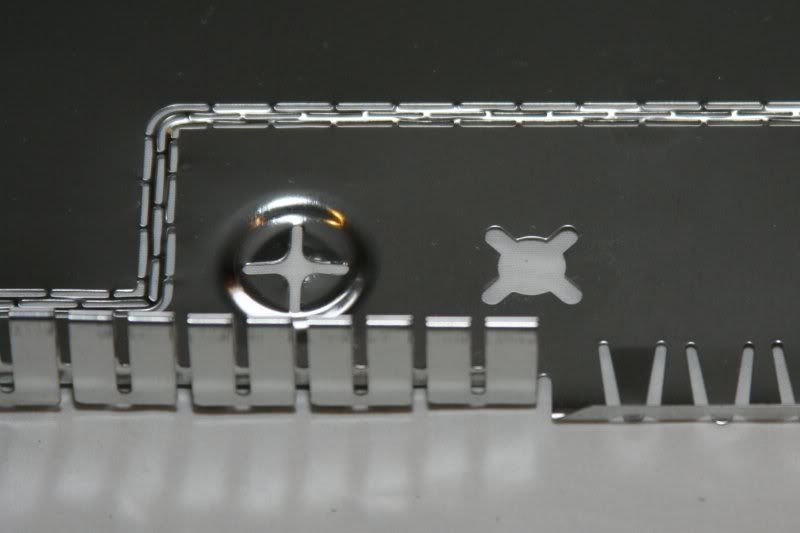
We need to drill a hole in the top plastic cover where the jewel was to let the light from our soon-to-be-installed LEDs shine through. Now, we want the hole to be as large as possible to let as much light through as possible, while still not letting the jewel fall through. The jewel is precisely 2 5/8" in diameter so, conveniently, a 2 1/2" hole saw (it's an attachment for your drill) will work perfectly.
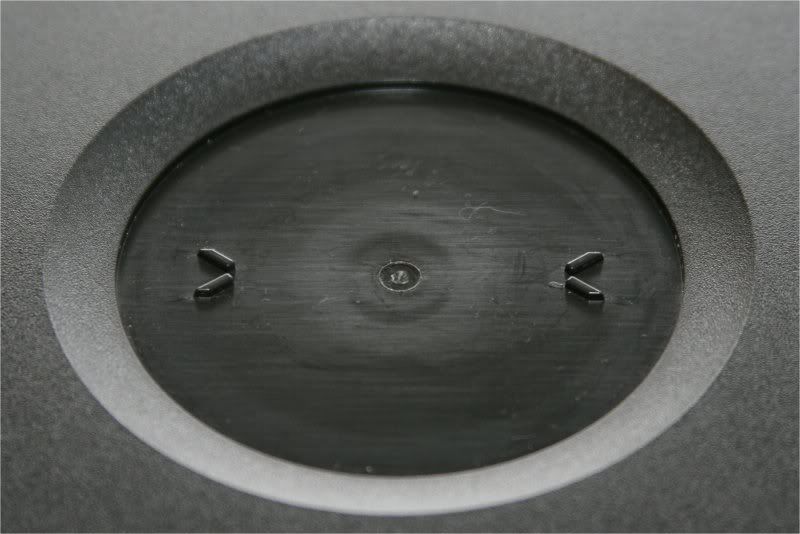
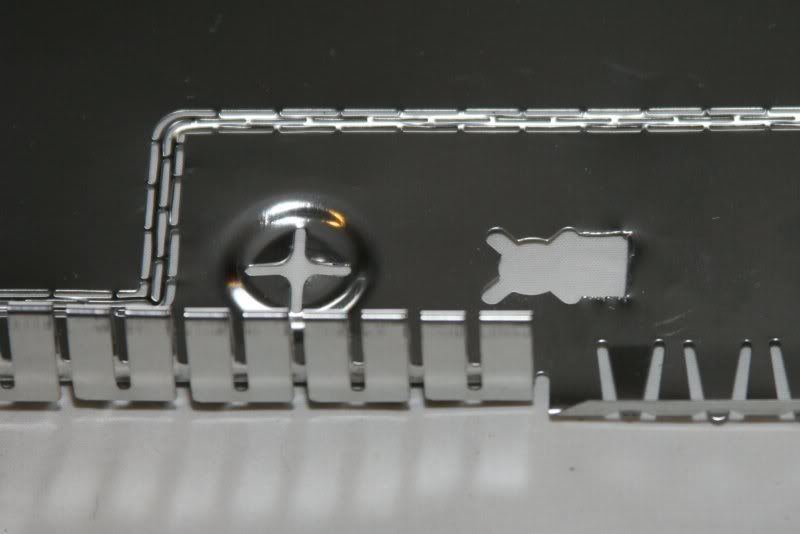
The trick with this guy is to get it centered. If you look closely at the center of the inset on the case where the jewel was, you'll notice a small circle outline. This is more than likely a byproduct of the original molding manufacturing process, but it happens to be dead center and that's exactly what we're looking for.

Take an X-acto knife or a sharp pocket knife or an ice pick or something sharp and make a little starter divot for your drill bit in the center of that hole. You can just eyeball it and it will more than likely be close enough.
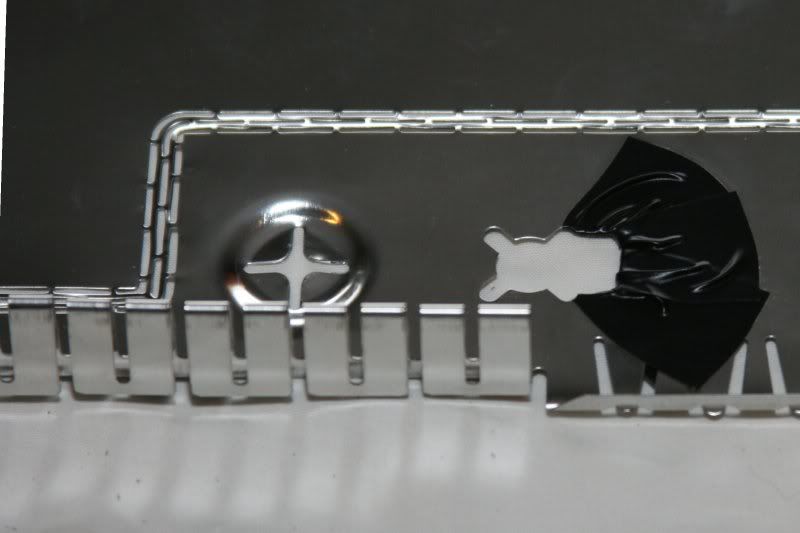
Now slowly and carefully start drilling. Always double check that you're:
- Still centered.
- Drilling straight down. Don't go drilling at some cockeyed angle or you'll end up with a hole that's either too big or the wrong shape!
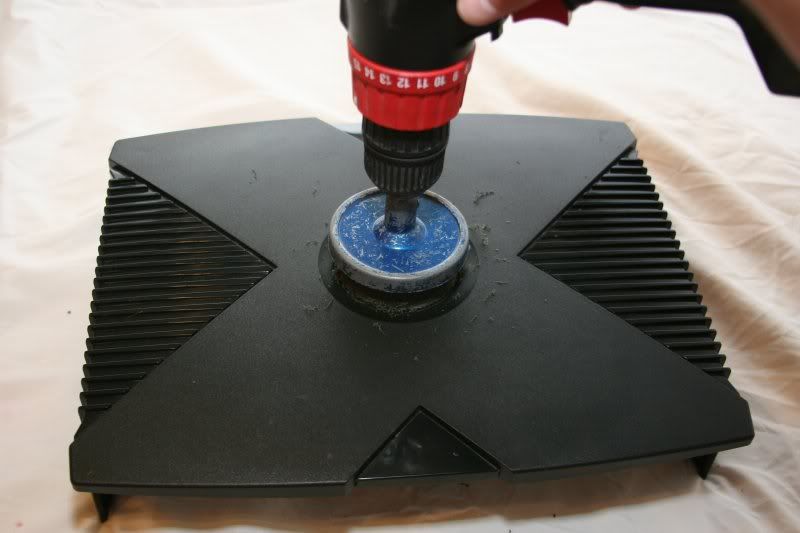
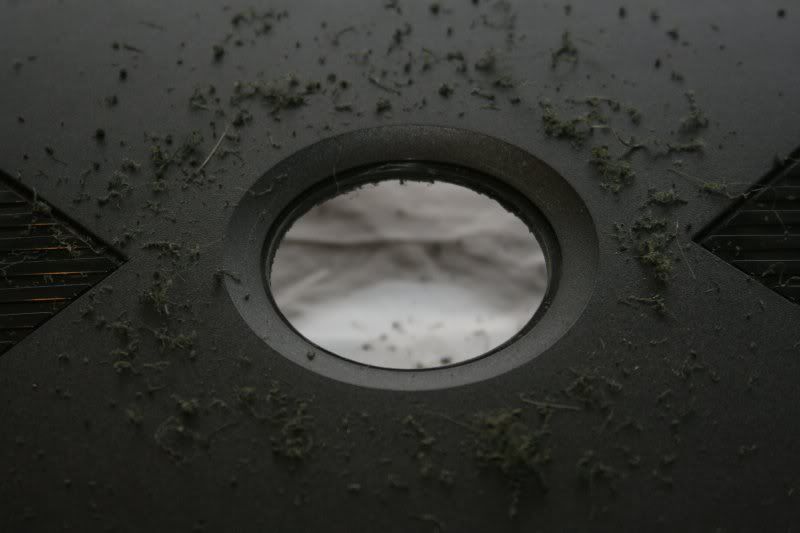
It shouldn't take too long, but remember, don't rush it. If you'll remember back to when you were polishing the jewel...remember how long and miserable that was? But you made it through it! You can certainly muster the will power to go slow here. Before you know it, you've got a nice, neat, hole in the top of your Xbox! I find it's nice to gently run a little sandpaper along the inside edge of the hole to help knock off any little burs or rough edges from the cutting.
My cat walked in at this point...not really pertinent to anything, but it was awfully funny. I suppose you probably had to be there.
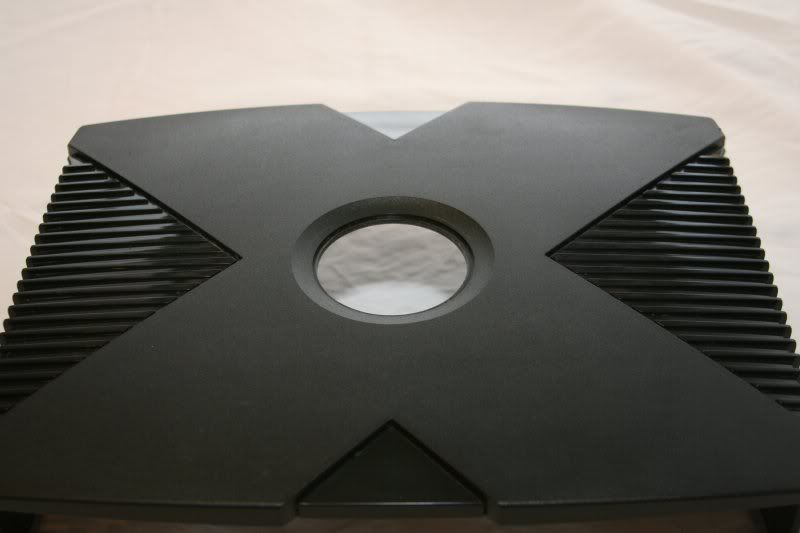
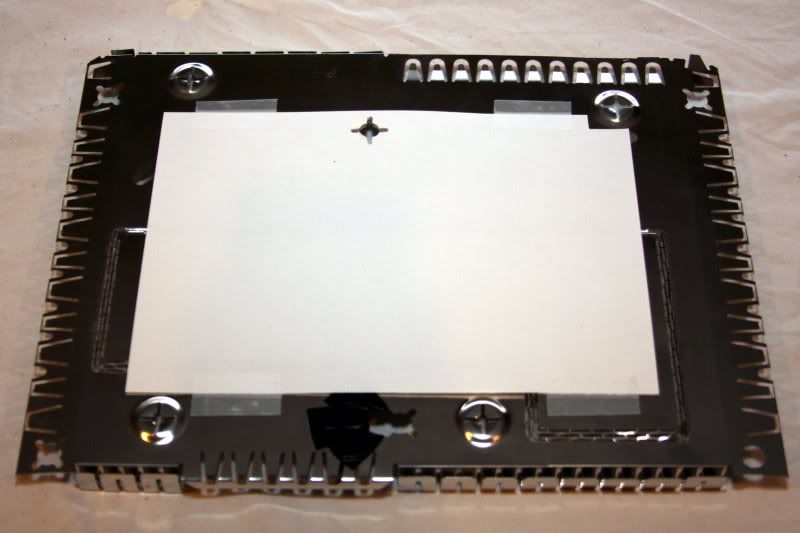
Ok, so anyway the hole is all finished and sanded now. Here's the front and the back just so you can get an idea of what it should look like at this point.
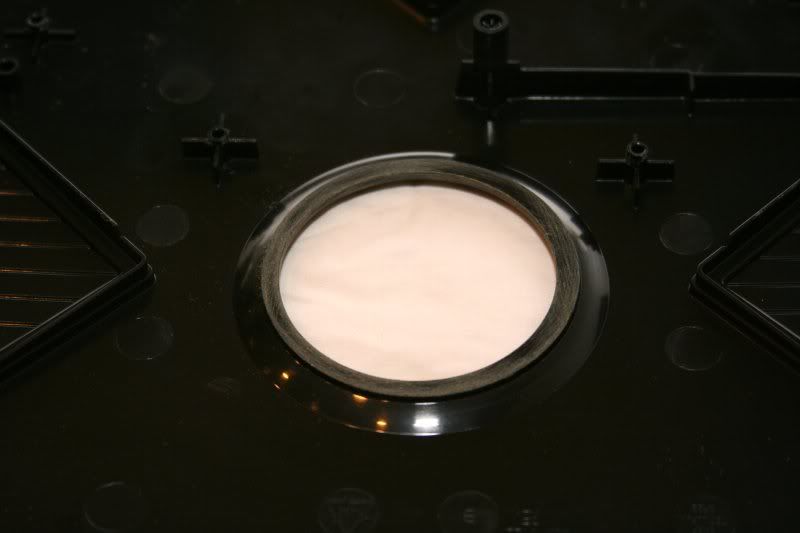
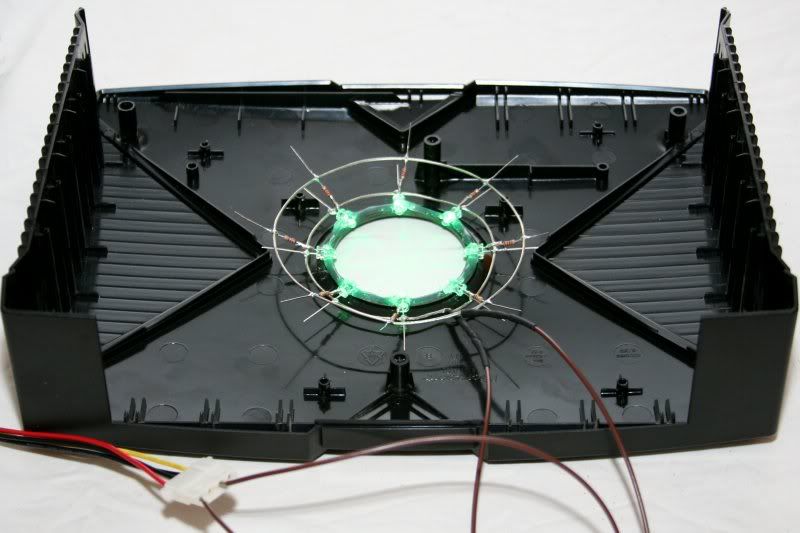
Now, just for fun, I threw the nicely polished jewel in to check for two things: First of all, whether or not the hole is the right size (i.e. does the jewel stay in or fall through...it stayed in of course), and also how cool it looks...very cool, in my own humble opinion. But it's going to get a lot cooler still.
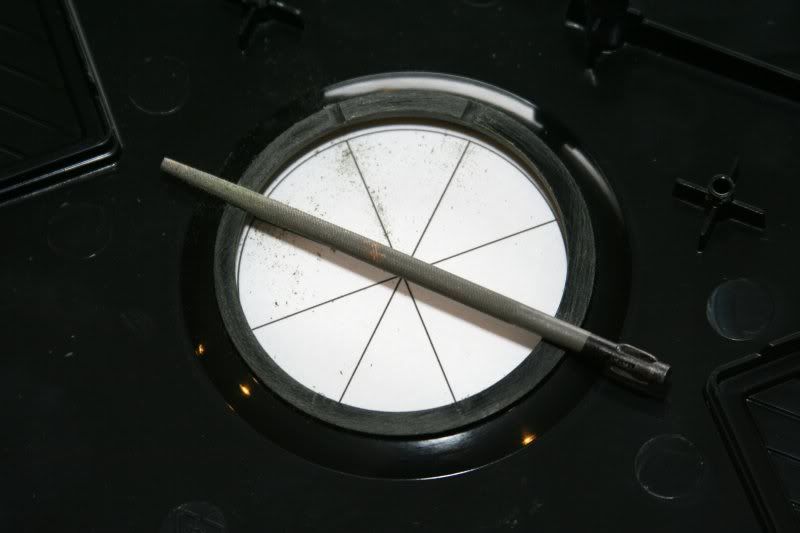
It's just about time to glue the LEDs in. First things first, though, we have to get the spacing correct. I simply whipped this little cheat sheet up, printed it out, set it under my lid and marked the spots where the lines indicated. I like to use a round file to mark where the LEDs go, being sure to keep it aligned with my spacing diagram. My reason for this is so the LEDs have a little cradle to rest in when I glue them in. This is very much optional, however. You can mark it any way you wish.
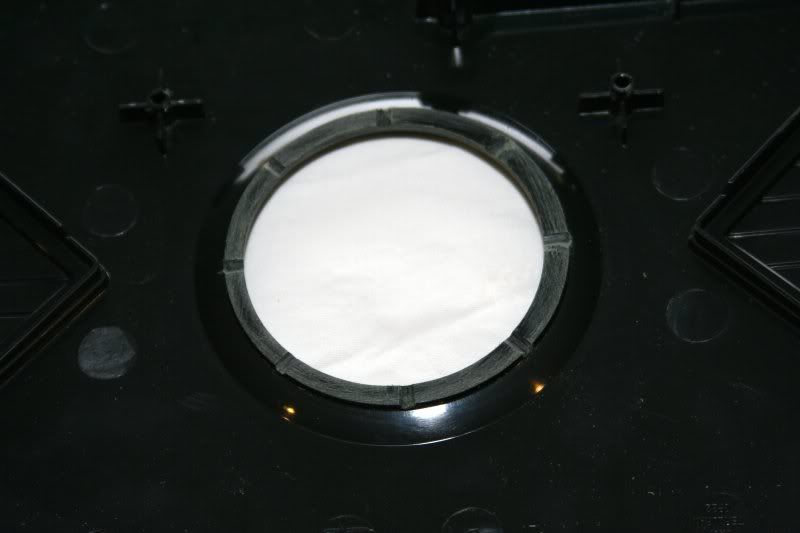
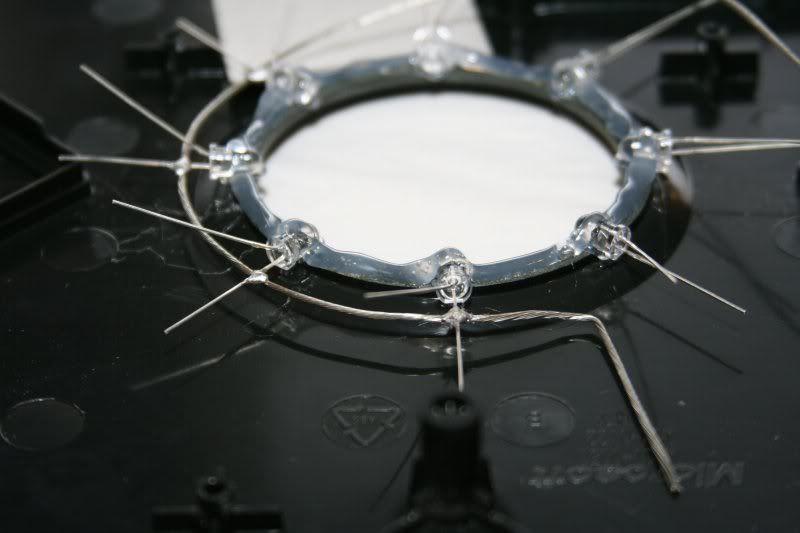
Now it's time to glue the LEDs on. LEDs have a certain polarity, that is to say, one wire is considered "positive" (it's technically called the "anode", if you want to get really geeky) and the other is "negative" (again, for you geeks that would be the "cathode"). Typically, the positive one is longer than the negative, but be sure to consult your electronics store or whatever to know for sure. I like to put all of the positive wires facing up for easier access when soldering the resistors on. Now, to glue these little guys on, first things first, do them one at a time! Start with a little drop of hot glue, set your LED in place and let it cool for just a few seconds before jostling it at all. This will hold it in place, but not very strongly. We'll come back to that in just a second, though.
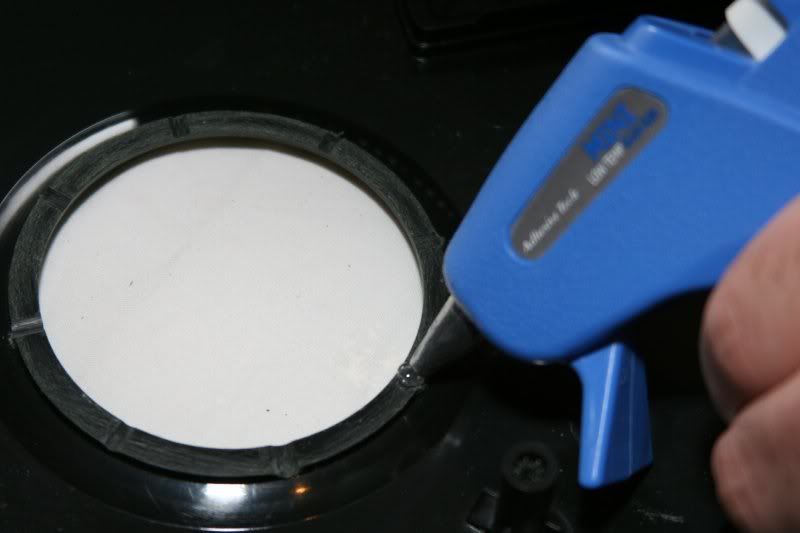
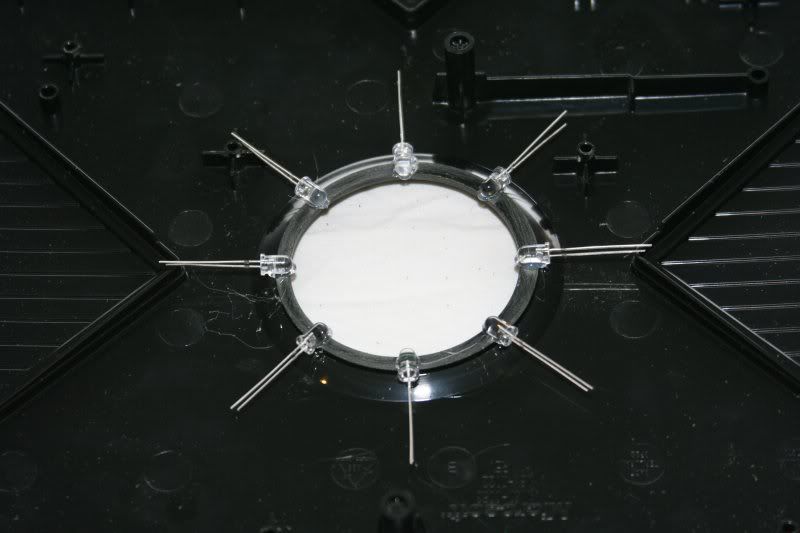
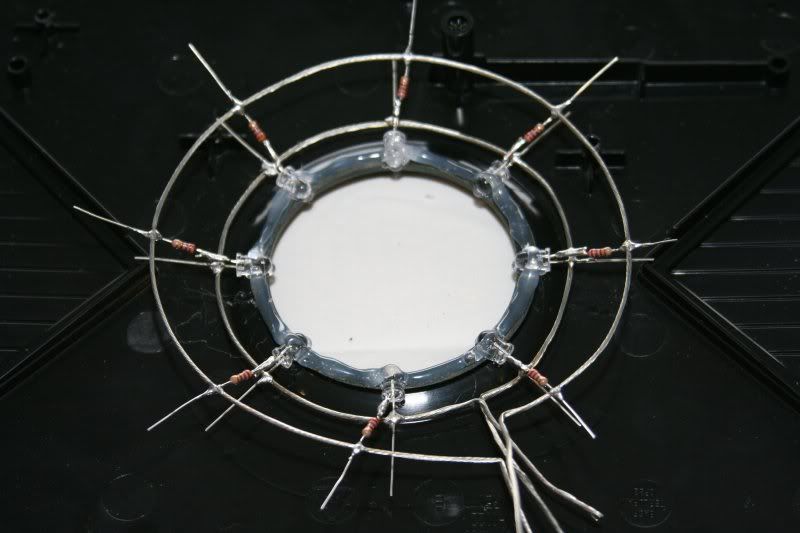
Once you have all of your LEDs in place, go ahead and run a bead of hot glue around the entire ring. This will serve two purposes: it will help hold the LEDs down better and it will help transmit the light around the whole ring instead of just 8 points.

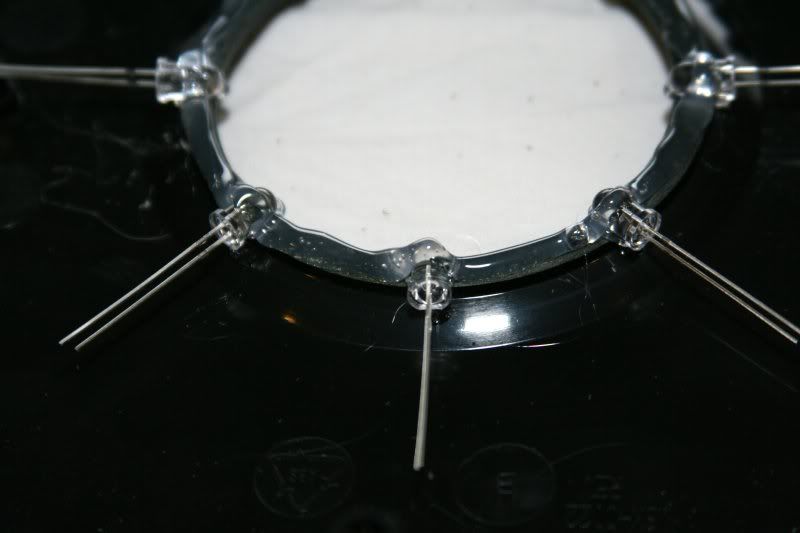
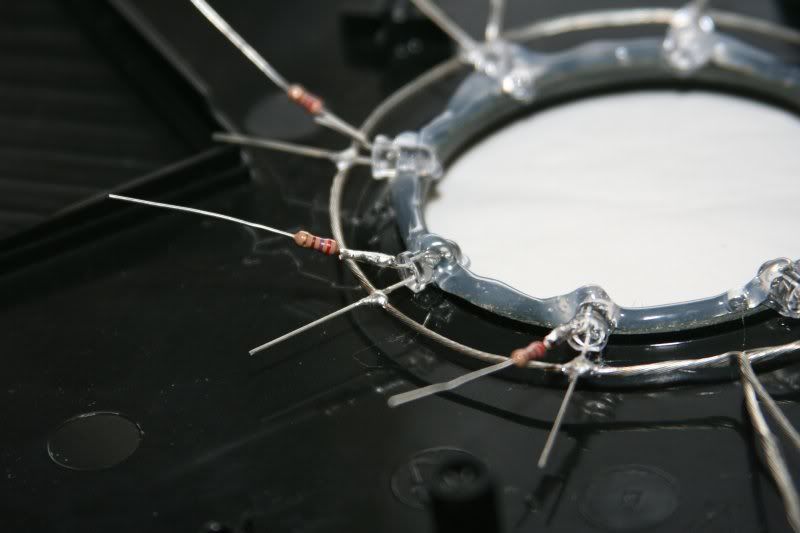
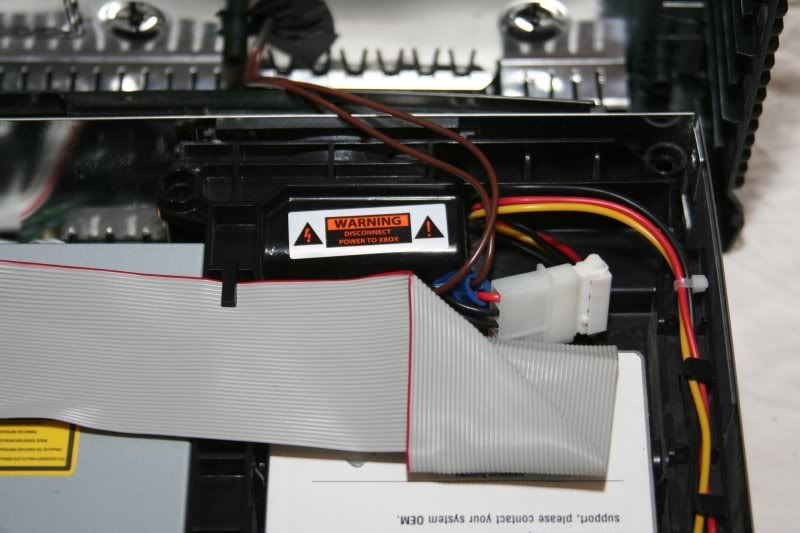
Now for the real fun...soldering :-) You're going to want a 15-35 watt soldering iron for this part. DO NOT use anything more powerful than this. If you do, don't come crying to me when you fry your LEDs, melt a hole in your case, cause global warming or worse. Unfortunately, I don't have the time to write a complete primer on proper soldering technique. If you don't know how to do this step, get someone who does to help you. You'll want to start by running a bare, stranded wire around your ring of LEDs between the two leads and about 1/2" wider in diameter (i.e. 1/4" away from each LED). Now just solder to the bottom lead (this is the ground wire) all the way around, one LED at a time. Personally, I like to run the wire below the LED wire, but that takes a little more effort and it doesn't buy you a whole lot. Do whatever you're most comfortable with. Be sure to have something like a piece of cardboard below your work at all times so you don't drip molten solder on your case. ALSO pay attention to where you start and end! You want your wire to start and end at the back right of the case (as depicted farther down in the first LED test). The reason for this is so when we finally tie this into power, we're already in the right spot and don't have to run wires the length of our case. My last little tidbit of advice is that as long as you're using a low-wattage soldering iron as I suggest, you can generally make your solder points about 1/4" away from the LED without any trouble.
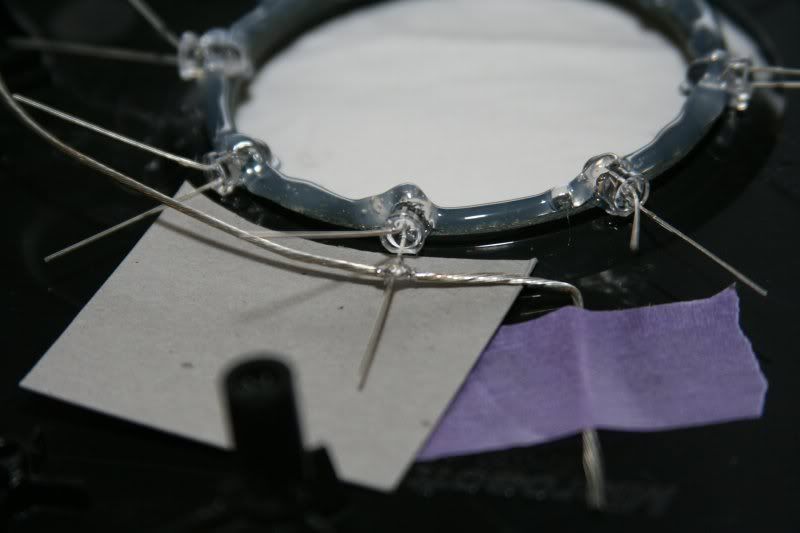
Ok, that's one ring...Now before you jump ahead of me and solder the positive ring, we first have to solder a resistor onto the positive legs of each of the LEDs. BUT WAIT, the critics scream, you're using WAY too many resistors! Why use eight resistors when you could use just one? Same reason you wear your seatbelt when you drive... While it's true that you can use a single resistor to limit current to the whole chain of parallel LEDs, it's not as safe to do so. If one of the "identical" LEDs has a slightly different power requirement than the others, it will quickly burn out or draw enough power to burn the others out. Resistors are extremely cheap (pennies) so you're far better off fronting the nickel and playing it safe. You will need to compute the correct resistor value for yourself or ask the expert (which automatically rules out Radio Shack) you bought the LED from. Be sure to consider that the LEDs will be powered by the 5 volt lead from the Xbox's power supply.
So, with that soap-box sermon given, here's what mine looked like at this point, after I got all of the resistors soldered on:
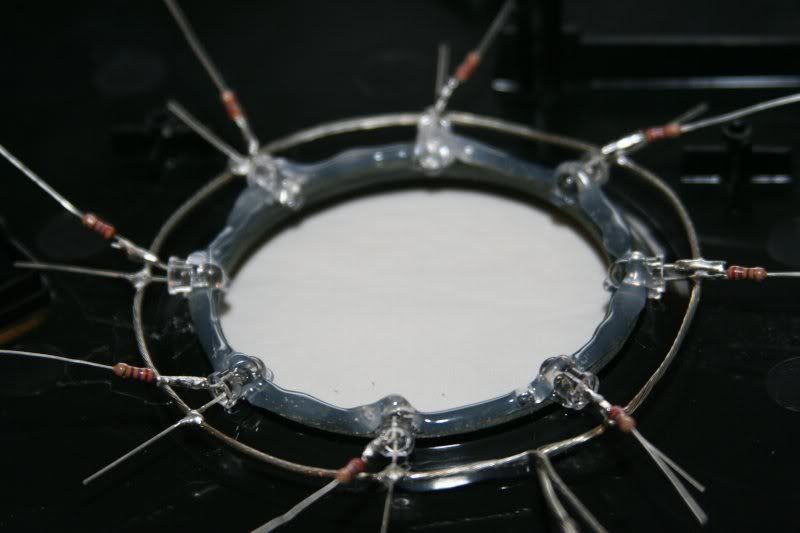
Alright, now you can solder the positive wire ring. The technique is the same as for the negative wire. Take your time but don't leave the soldering iron on the wire and go to lunch. Keep it about 1/4" away from the resistor to be safe (you can solder closer, but I'm all for erring on the side of caution). In this case, I like to solder the wire on top of the resistor wire, but again, do what you're comfortable with.
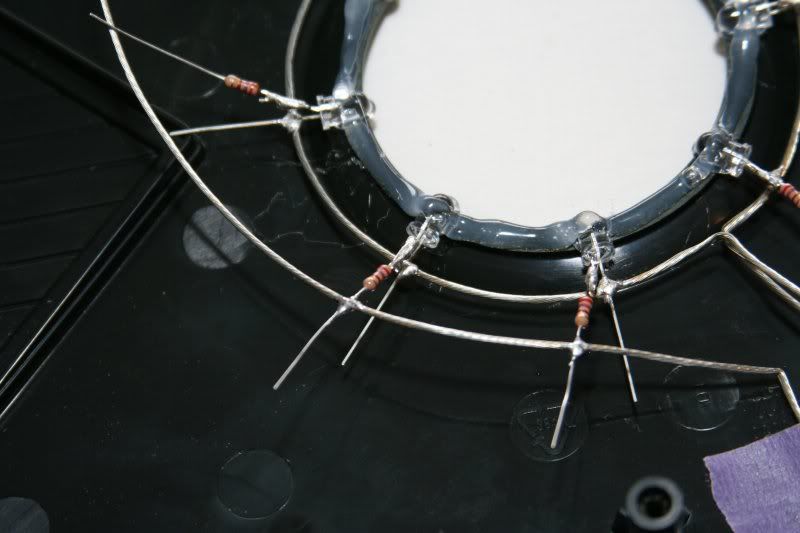
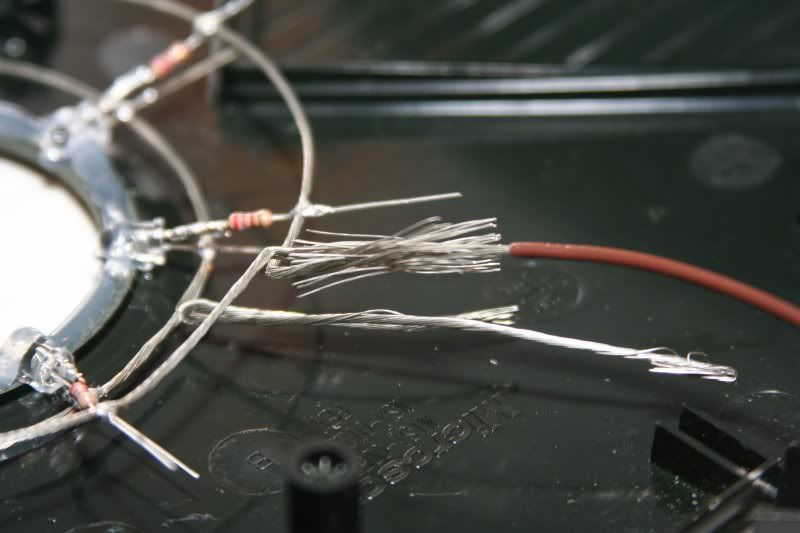
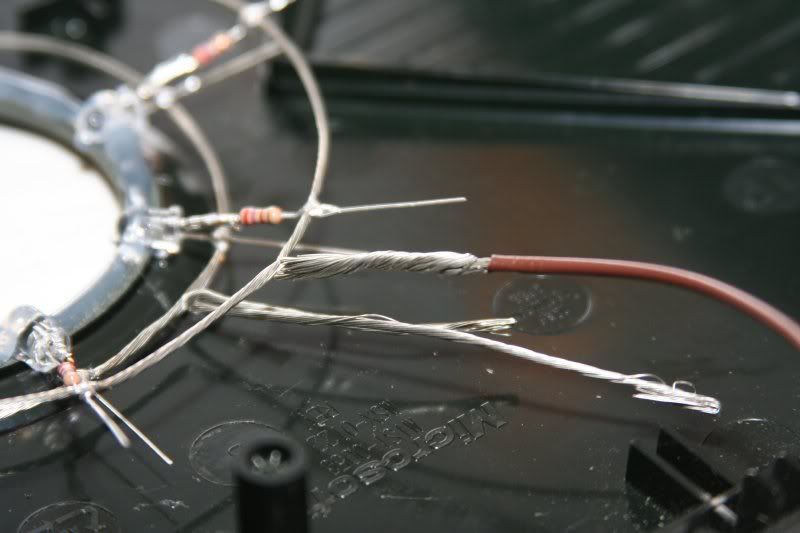
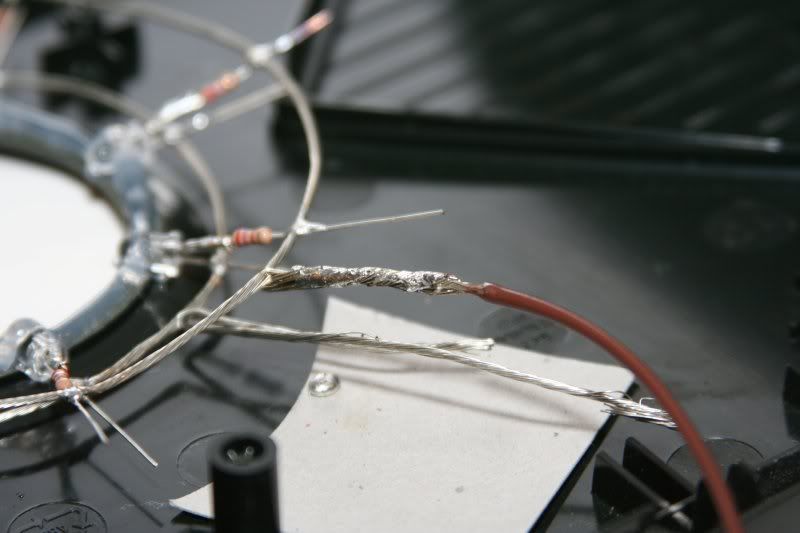
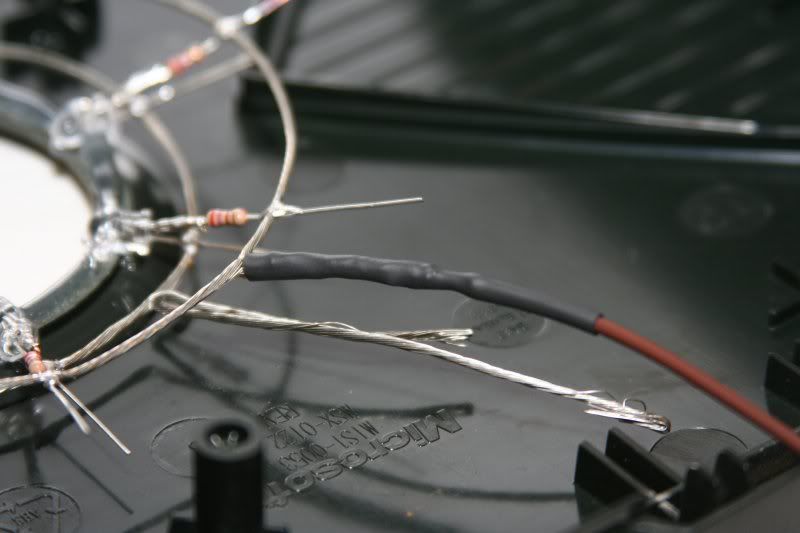
Sweet honey mustard, that takes a while. BUT it beats polishing the jewel ;-) At this point you could clip any excess wire from the LEDs but I personally like to wait until I'm sure everything works!. Now we can get into a little bit simpler soldering project, and then we'll be done with the soldering...I promise! (unless you screwed something up in which case fire it up again :-/) Now we simply need to solder two longer wires to the wire rings so we can connect them to power. Strip about an inch of insulation off the end of one of the longer wires and twist it together with the two ends of one of the rings as shown. Slap some solder on that connection and then seal it up. I like to use heat-shrink myself, but electrical tape works well too. If you'd care to use heat-shrink, you'll need a hair-dryer or some mild heat source to shrink it into place. Repeat for the other wire as well.
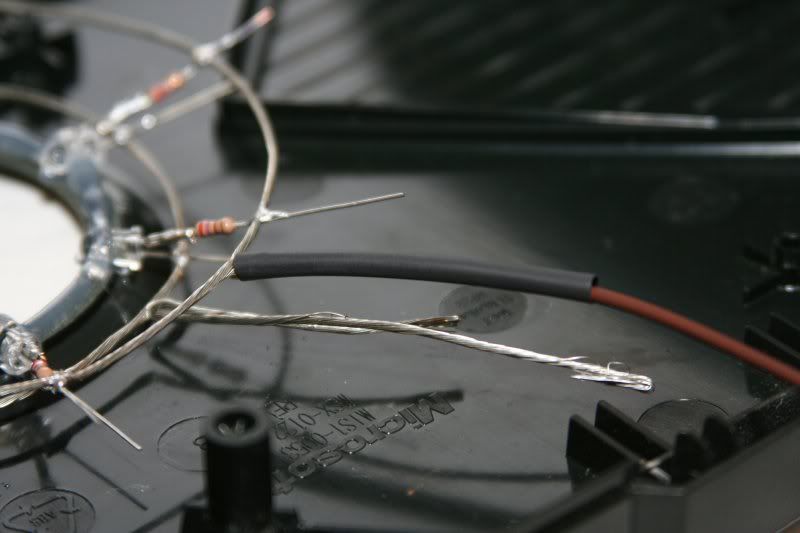
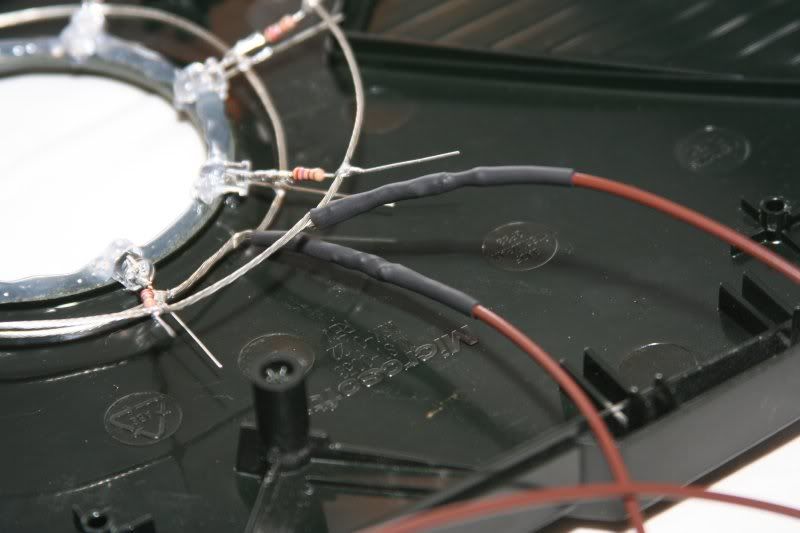
Now, if you'd like to test your setup at this point (and who wouldn't), you can IF you promise to be very careful 8-| Take the base of your Xbox (with all the guts in it) and disconnect the power plug from the hard drive. You're going to have to do this eventually anyway, so you might as well do it now. Strip about an inch of insulation off your positive wire (the one that leads to the ring connected to all the resistors), twist the wire nice and tight, fold it in half as shown and stick it in the plug that leads to the red wire. Now repeat for the negative wire and stick it into one of the black slots (doesn't matter which one). Plug your Xbox in, cross your fingers and hit the power button. If you did everything right it should light right up and keep running. If you have a short, more than likely the Xbox will hiccup for a second like it's trying to turn on but then do nothing. This is the machine's way of protecting itself from a short. Now turn it off, unplug everything and let's finish this mod up!


You can start by clipping all of the excess wire from the LEDs and the resistors. This is simply to avoid unnecessary wire lying around, waiting to cause a short. The next thing to do is make a non-conductive spacer to put between the positive and negative leads from the LED. The reason for this is simple: when we put this all back together, the wires are going to be squished together. You don't want them to touch :-) You can use electrical tape, or as I prefer, a nice cardboard ring made out of the side of an old case of pop...For the record, heavy cardstock would work just as well for this, I just happen to have an over-abundance of pop case boxes and needed some use for them.
With that, we turn to the tin heat-shield. First thing is to make a hole for the wires to come out of. There's actually a convenient hole already in place towards the back of the piece. It's not quite large enough to accommodate our wires, though, so we need to widen it a little bit using a pair of tin snips. Once you have the hole cut, throw a couple pieces of electrical tape over the edges to help soften them up so they don't accidentally cut the wires.

Now, flip your heat shield over so you're looking at the side that will be pressed against the LEDs. We need to insulate this side in a similar way to putting the cardboard ring between the LED wires. This time, however, our insulator will serve the dual purpose of being a nice background for the LEDs to light up underneath the jewel. For that, I like to use a nice, white piece of cardstock. Simply cut the cardstock down so it's 8 1/2" by 6", and tape in place like so: (Note: You will have to trim the corner slightly to uncover the grabby tabs and also cut a hole for the screw mount.)
If you would rather have the shiny metal background of the heat shield for the LEDs, that's fine, but you still need an insulator on the heat shield itself. The simply solution is to temporarily hold the heat shield back in the cover, and trace along the hole in the cover then cut it out, leaving the rest of the cardstock in place. Now, simply fish the wires through the hole you cut (keeping track of which is positive and which is negative) and snap the heat shield back into place. Notice that you will only be able to use four of the grabby tab holes...this is perfectly sufficient.
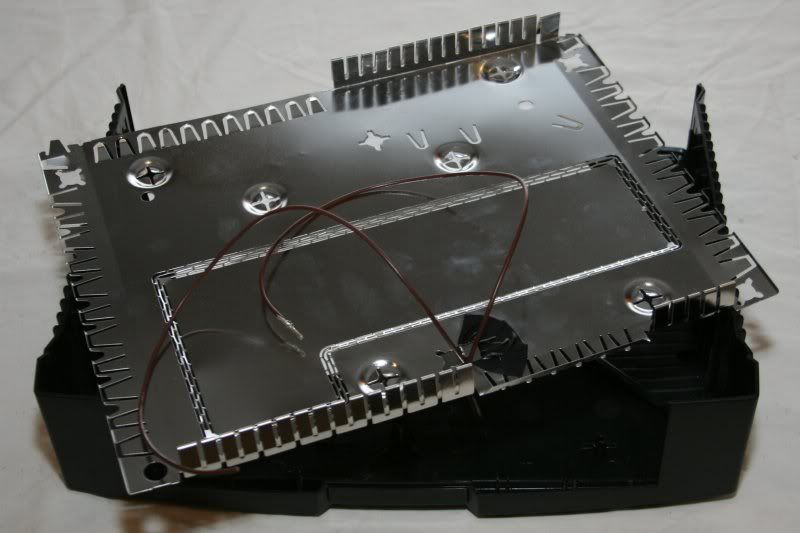
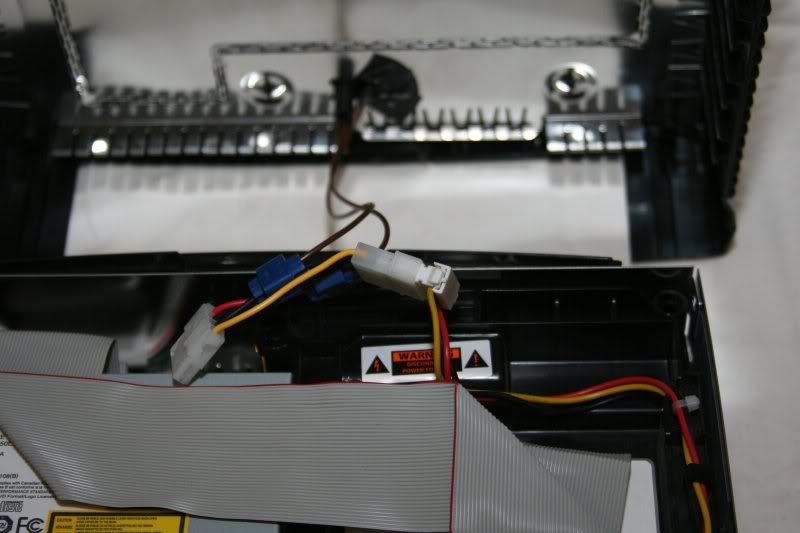
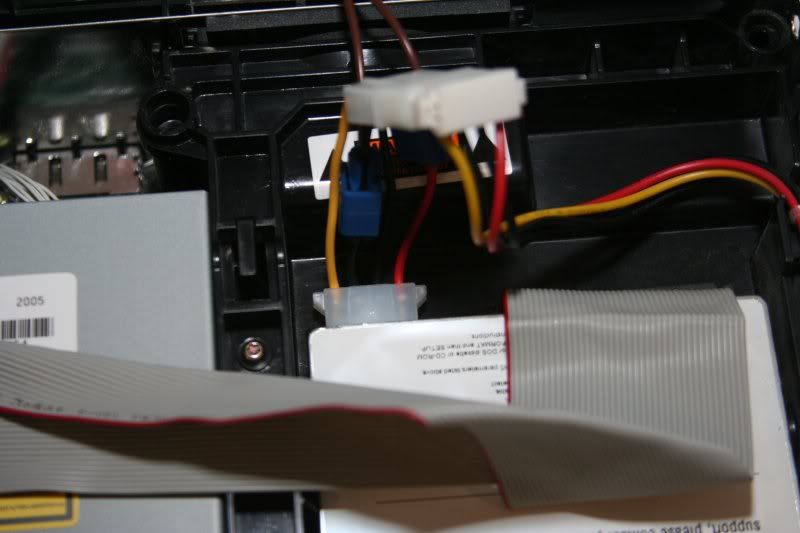
Finally, we're almost there! The next thing you'll need is a 4-pin extension (hint: many case fans come with these...you simply need to clip the 2 or 3 pin wire off. You can probably get them at your local electronics store too.) and two tap splice connectors (again, available at your local hardware store). Simply splice the wires from your LEDs into the 4-pin power extension; positive to red, negative to black, being sure to stagger them to keep the whole thing thin, and you're good to go!
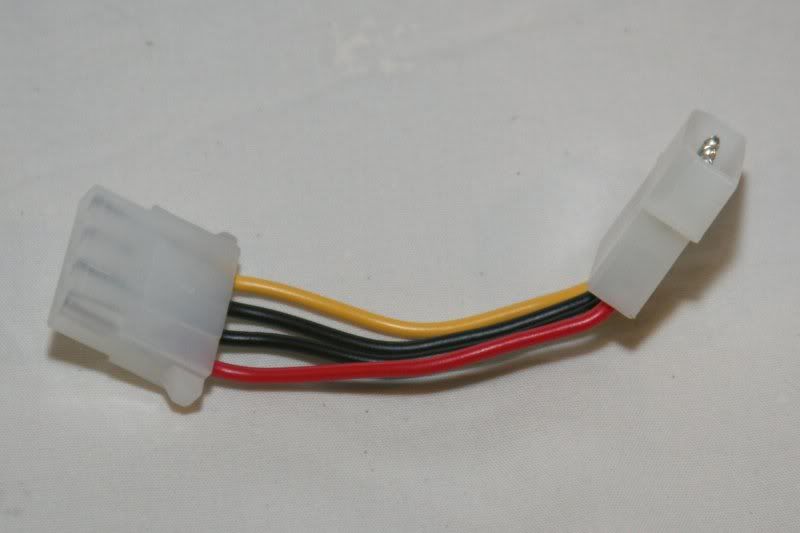

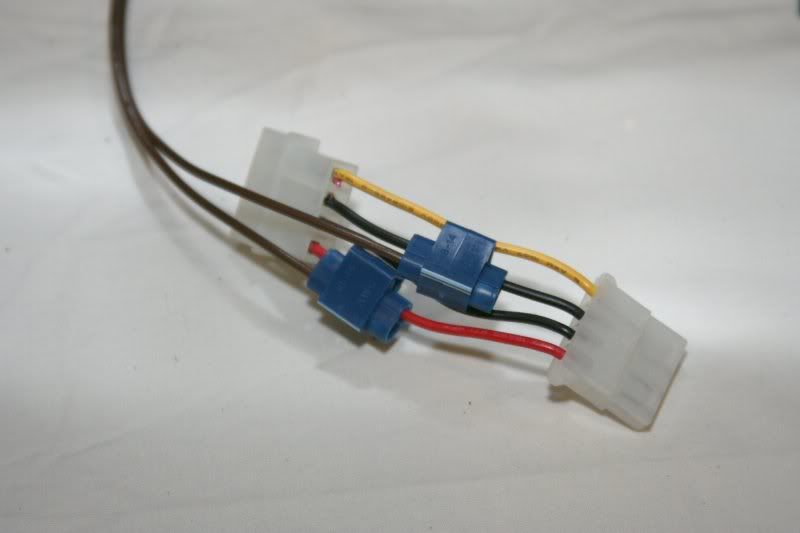
The reason for using an extension instead of splicing directly into the hard drive's power line is simply for convenience. If anything were to ever go wrong, you can simply remove your wiring and you're back to normal. Now plug all your wires back in, power supply to the spliced extension, and then the extension into the hard drive, and fire it all up again to make sure there are no mistakes...and to marvel at how it's coming along :-)

If everything works and you're happy with how it looks, then carefully coil the wires into every last available space and carefully put the lid back on. Make sure the lid snaps all the way down; you might have to jiggle it a little depending on how stubborn it's being. Carefully flip your Xbox upside-down again and replace all of the screws in a similar manor to how you removed them. Turn it back over and give it one more test...This time there really is a good reason for testing it. I can't count how many times I've gotten an Xbox this far and plugged it in only to have it not work :-/ If everything is still good, then use just a couple drops of superglue (or hot glue if you'd rather it not be so permanent) and put the jewel back into place.
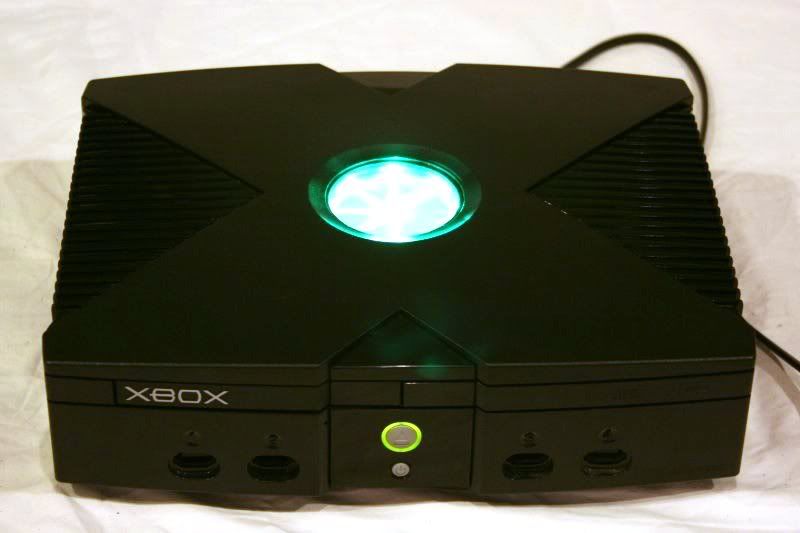
With that, you're done! Enjoy your new modded Xbox!
Let me know your thoughts, (intelligent) comments or any questions.
18 comments:
Nice Tut. Very Deatiled with ALOT of pics, just what I like.
Just wanted to let you know that you should REALLY try rubbing alcohol (99% pure isoproyl rubbing alcohol) for the removing the paint step. I did the brasso method and it took me 4 hours with an old cotton t-shirt, tried rubbing alcohol and it took me 5 minutes with the same t-shirt. Try it out.
I really like your method for removing and polishing the jewel, and the cheat sheet you provided proved very valuable to me, but as far as actually installing the LEDs I like this tut better: http://www.llamma.com/xbox/Mods/xbox_jewel_led_mod.htm
You're tutorial was excellent, though :). Another tut almost had me putting the top of the case of my xbox in the freezer for a half hour and then smacking it on the back to get the jewel off.
Thanks for the feedback! I'm glad you all like the tutorial, it was certainly fun to make. I hope to do another one reasonably soon that will include a fan mod and maybe a few others. I'll try to incorporate everyone's good ideas :-)
To "harcroft", I'd like to say thank you for the tip about the rubbing alcohol. I'm not entirely certain if I can buy that concentration where I live (ONLY because I haven't looked and I don't recall every seeing it on the shelf) but I'll definitely give 70% a shot next time I do this.
To "aaron", good job finding the tut that was my inspiration for the LED's :-) Having done this a couple times now, I'd have to agree that I like the method you posted better. While *technically* one resister per LED is safer, in practice one for the whole bunch is probably just fine. Really, if one LED went out I'd probably rip the whole thing apart and fix it anyway, so what if they all go out? Good find, though, and good thought. I'll almost certainly do that next time around. And yeah...I've tried the freezer method. It blows :-/ Left it in there for an hour and smacked, twisted and pried on the blessed thing more than I was comfortable with. Ah well, if necessity is the mother of invention then certainly laziness is the father :-)
Cheers everyone!
Sorry I know im late but could not resist
hey hows it going. What i will say that this is most sickest tutorial ever written. This is one of the most cleanest write-ups in modding history. Plus well done. I am also a well a was a first timer. Well was a first timer. Now im a intermediate modder. Slowly understanding how to paint and stuff. Anyways keep up the good work. later
Hey, thanks :-) I'm always glad to hear when someone appreciates my work. I'd love to do more of these, but I just don't have much time these days. Anyway, thanks again and happy modding!
impressive work! thanks for posting.
cute cat too
If Carlsberg did Tuts!
Excellent work, all tut`s should be like this.
I used the 70% alcohol method, but I have fingerprints etched into the front of the jewel (the curved part.), and I don't know what to do. I have considered using a buffing wheel. Wht should I do?
In addition to my last comment, when I removed the jewel, underneath the adhesive was a really tough yellowish-white layer. I don't know why it was there, but I feel like my jewel is different. will this change the mod?
Overall, this looks like a great project!
I know this is years after the original post..but got my hands on a free xbox original and was looking to do some lighting mods..amazing write up and I found an easier solution than adding resistors after the leds are mounted...they are pre-wired w/ resistors, can handle up to 6v and are 3mm leds as required. They are even neatly shrink wrapped :D
http://lighthouseleds.com/pre-wired-leds-1/6-volt-v-pre-wired-leds/6v-3mm-pre-wired-leds.html
You can use any color you desire and then not so much have to worry if the coated wires touch..I will still be installing a small shield but that's jsut me.
Dude thank you bro. It worked on mine. except that i did not use the same amount of leds. i only used 5. It looks awesome the only trouble i had was when i was connecting the power cable to the harddrive cable. What i did was that i switched the cables from the spliter and walla it poewered on. Then i needded to resotter of the leds and where in buissnes. Again thanks and God bless.
If i do just as you do using red leds at 2.0 20 what resistors do i use thanks in advance
Nice! I loved this tutorial and am working on one for mine. I have the current parts I am at in this link: https://imgur.com/a/3ga2J yes I know my hot glue gunning is messy and so is the soldering but that's what happens when I am not as experienced. That part won't show up in my finished product though. The nice thing is I found this controller pictured here: https://imgur.com/a/Kt25l at a goodwill near me and now I don't even have to tear open a Xbox controller for that part! I am also soft modding my Xbox after I am done with this then I will also add a upgraded hard drive. Going to be a pretty sweet device! I will upload more photos when I am done.
You talked about voiding your warranty, then I looked at the date and realized this thread is over 10 years old! Anyways great tutorial!
I love your post. Thank you.
Fantastic tutorial, great pictures, informative, hilarious writing. 10/10
Post a Comment